
Extrication Tips: Stabilization 101, Part Two
Randy Schmitz
Features Extrication TrainingIn the October issue we talked about basic stabilization and dealing with vehicles that remain on their wheels when involved in crashes. This time we’ll focus on situations in which vehicles are found resting on their sides or roofs.
 In the October issue we talked about basic stabilization and dealing with vehicles that remain on their wheels when involved in crashes. This time we’ll focus on situations in which vehicles are found resting on their sides or roofs.
Many older vehicles were built with heavier construction materials and had a square, box-like shape, which made the vehicle less likely to roll over in an accident. The shape of vehicles today has changed because of the need for better fuel economy. Refined aerodynamics and lighter construction materials are being built into newer vehicles to assist with better gas mileage. As a result, body styles have taken on a more rounded, bullet-type shape, which makes vehicles more inclined to roll over onto their sides and roofs.
When a vehicle comes to rest on its side or roof, it puts emergency service personnel and crash victims in a hazardous situation. The objective, at this point, is to make the vehicle stable enough to be able to work safely while considering possible extrication pathways for your patients.
There are many types of mechanical stabilization devices on the market today to help with these types of situations, all varying in load capacity, adaptability and cost. For the emergency service that has a limited budget and cannot afford these devices, there are inexpensive alternatives. These alternatives may not offer the same flexibility as engineered stabilization equipment but they can be used safely with a little ingenuity and innovation.
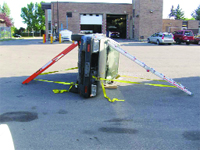
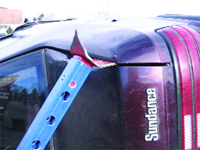
Ladders, which we all carry on our fire department apparatus, can come in handy to stabilize a vehicle. Use ratchet straps to secure the ladders to the vehicle and you have an inexpensive stabilization system. (See photo 1, below.)
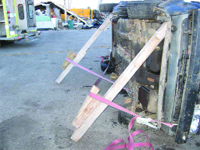
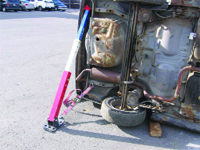
Another cost-effective option is to simply carry four- to six-foot 4 x 4 posts with notches cut into the ends to dig into the road surface or underside of the vehicle, again using ratchet straps to secure them to the vehicle at angles of between 45 and 70 degrees. Try to wrap the straps as low as possible on the posts and keep them as straight as possible. You can insert wedges to keep the strap from riding up on the post and becoming loose. (See photo 2.)
The first step after incident size up of a side-resting vehicle is to determine which way the vehicle is most likely to tip over or shift. This will depend on the location, the damage to the vehicle, the ground conditions and whether the vehicle is leaning more to the roof side or to the wheel side.
If the crash is on flat pavement, more often than not vehicles will want to roll over toward the roof side because of the angled design of the roof structure. If the tires of the vehicle are intact, they will generally keep the vehicle from rolling back over to the wheel side.
This could be the exact opposite if the crashed vehicle is found on the side of a hill, overpass or embankment. Each situation will present itself with its own challenges, hindrances and obstacles.
It is considered best practice to use wedges as initial stabilization on the side that needs to be dealt with first. This should generally be your first step before employing the side-resting type of stabilizing equipment. This will at least make the vehicle somewhat stable before you continue on to the next level of total stabilization.
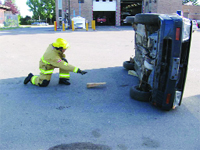
By maintaining a safe distance from the fall zone of the vehicle in case it rolls over, you can insert wedges by getting down on one knee and sliding the wedges along the road surface until the wedges make contact with the vehicle. Voids can be filled after you have safer access to the vehicle. (See photo 3.) A pike pole may also come in handy to insert wedges or 4 x 4 blocks if you feel the vehicle is really unstable.
Now, let’s look at more sophisticated stabilization systems that offer a little more flexibility.
There are many brands of strut-type or telescopic systems available on the market. All basically operate the same way with the same principles applied and most offer a variety of accessories. Depending on the applications of each department, the load capacity, price and ease of use will be the deciding factors in determining what brand will suit your needs.
Price
Prices range from less than $100 for a basic set of Z-Mags to a few thousand dollars for systems that can be used for vehicle rescue and higher-load rated building collapse/trench-rescue applications.
All the systems have slightly different tips, base plates and accessories. Also, the body construction can be either metal, aluminum or fibreglass composite material. A few offer the capability to lift a vehicle upward slightly or other such heavy objects.
The Calgary Fire Department has done a year’s worth of extensive testing with all the popular brands available and has chosen the Rescue 42 brand as the best strut to suit our needs. This system offers an accessory to assist with the lifting of a vehicle or object in conjunction with stabilizing, which our department has already put into use a number of times during extrication operations over the last two years.
In choosing the right system for your department, ensure you do extensive testing and research, as what may work for one department may not necessarily work for another. Test wisely, consider price and ease of use and do not buy the first set you try out. Test as many brands as you can.
Side-resting vehicles
Once initial stabilization has been accomplished, have a team member position himself at one end of the vehicle and put his hand on the vehicle to monitor any movement. This will assist in determining whether the vehicle may shift or tip over onto rescuers as they are making the vehicle stable enough to work with, and give them ample warning to get out of the way.
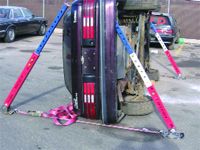
Choose how many struts will be needed to secure the vehicle; four-point stabilization is the best, meaning two struts per side of the vehicle, but three-point can be used as well. (See photo 4.)
If possible, position the head or tip of the strut above the centre of gravity, preferably high on the vehicle and definitely on something structurally solid like the framework, when dealing with the undercarriage side. Take advantage of tie-down slots or other holes in the framework or unibody to lock the strut-head tip in place when you tighten up your ratchet straps. On the sheet metal or roof side of the vehicle you may have to be a little more creative to find a good location to insert or lock in the strut head – a popular location is the void in between the hood and the fender at the top of the side-resting vehicle. A lot of times the void acts as a built-in purchase point to insert the tip point of the strut head. (See photo 5.) Another location is in the corner of the A-pillar where it meets at the dash line.
However this may pose a problem if the windshield is still intact, as you would have to break the glass and possibly cause it to fall onto patients below. It also positions the strut and strapping closer to where possible extrication work will take place and could hinder operations or egress of patients if roof-flap or roof-removal evolutions are planned. Pre-plan your strut positioning wisely.
Strut placements
If a void is found to be of sufficient size underneath the front or back of the vehicle at ground level to slide ratchet strap webbing and hook through, place two properly extended struts on each side of the vehicle and connect the two base plates together. Keep the base plates in line with one another. If they are offset, the plates will shift from the originally intended location when the ratchet straps are tightened. This method is the most preferred because it is quick to assemble and creates a good solid footprint or triangle for stabilization.
When you cannot insert a strap underneath the vehicle, try to hook the strap directly to the vehicle from the front of the strut plate to a low point on the vehicle. (See photo 6.)
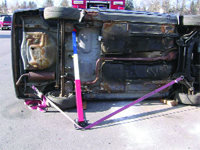
If you cannot find a feasible attachment point try the following: in a straight line, hook one end of the strap around the front of the vehicle then back to the rear of the strut plate, then feed the strap through the slot and continue the strap onto an attachment point near the other end of the vehicle, creating a V-pattern.
Using the strap through the back of the strut plate forces the whole plate to stay on the ground when the strap is tightened. If you feed it through the front of the plate, it will have a tendency to lift the front portion off the ground as it is tightened and reduce the surface of the base plate that is in contact with the ground. (See photo 7.)
Strapping tips
Another area of concern is if you cannot find a suitable purchase point in which to insert the strut-head tip while stabilizing on the sheet-metal side of the vehicle. With a little innovation, a solution to this problem is possible.
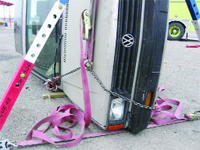
Set up a strut at the proper length and angle; choose whichever base plate strapping method described previously that will work. Take a length of rescue chain and hook it from the A-pillar closest to ground then around to the vehicle frame, keeping a bit of tension on it. Next, take another ratchet strap and attach the strap hook to the chain, loop it around strut head and back to the chain, then tighten the ratchet strap until there is no slack in either the chain or the strap itself. This will force the strut head into the sheet metal tightly enough to hold it in place. This method can be applied to almost all strut systems on the market today. (See photo 8.)
Roof-resting situations
More often than not, when a vehicle comes to rest on its roof, the engine end will be down on the ground. However, some vehicles could still remain balancing on their roofs and this may present some stability issues as the vehicle could easily rotate. Cribbing between the void of the hood and the ground will be necessary and should also take care of any forward or rearward motion in addition to side-to-side movement if on level ground.
Be sure to also place cribbing at the rear of the roof near the rear window area to complete your initial stabilization.
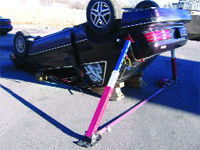
If you find that the vehicle roof is weak and are worried about further collapse, place two struts on each side of the vehicle at the rear fender areas at 45-degree angles and attach a ratchet strap to the two base-plates leaving the strapping a little slack.
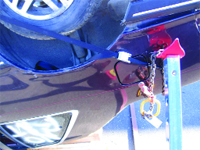
Attach three-eighth rescue chain into the chain slot on the strut head, run the chain under the vehicle where the bottom of the rear window and trunk lid meet, then take out as much slack in the chain as possible. You are essentially saddling the rear trunk lid with the chain. Tighten base plates together with the ratchet strap until the chain has no slack in it and it is tight to the sheet metal of the vehicle. (See photo 9.) For additional safety you can hook another smaller strap to the chain and tie it back to the vehicle if the chain might slip off. After the strut system is secured, adjust all other cribbing to maintain contact between the vehicle and the ground. (See photo 10.) This method allows good access to the rear and sides of the vehicle without interfering with extrication operations.
If vehicles are found on slopes or embankments, attach a winch line, rope or other securing device from the vehicle to a solid object. Pickets or stakes can be driven through the hood and into the ground to assist in securing an inverted hood-resting vehicle. This initial type of stabilization may be required prior to employing the methods described above.
Ratchet-strap operation
A frequent problem when using ratchet straps is that rescuers do not pull enough of the webbing strap through the drum slot before cranking the ratchet-strap handle. This will result in a drum that has been wound too full of webbing for the ratchet assembly to continue to operate and not enough tension on the webbing to secure what the strap hook is connected to.
Best practice would be to pull enough strap webbing through the drum slot to allow slight tension on the webbing. This should equal about three wraps of webbing rolled onto the drum barrel once the ratchet handle has been operated. It allows for a couple of more wraps if further tensioning is required during your extrication procedures.
An important safety point to note is that rescuers must ensure that the ratchet strap handle is in the locked-down position to gain full capacity of the ratchet-strapping assembly, otherwise it could inadvertently become dislodged and system failure could result.
Other applications for strut systems
Struts are not limited to vehicles. They can be used for light structural stabilization, such as keeping overhead garage doors open during a fire situation and for securing fallen trees, utility poles and ceilings. They can also provide temporary shoring of a light building collapse. However, always make sure you are familiar with the load-bearing capacities of your particular strut system before putting it into use.
Terrain, vehicle size, vehicle weight, vehicle condition and other factors may demand additional equipment or alternative techniques. Each situation will dictate unique precautions.
The above methods and procedures are just a few of the ways you can use strut systems. Always refer to the owner’s manual for complete instructions and guidelines for other alternatives, tips and safety procedures.
But consider these options to add to your toolbox!
 |
| 1 |
 |
| 2 |
 |
| 3 |
 |
| 4 |
 |
| 5 |
 |
| 6 |
 |
| 7 |
 |
| 8 |
 |
| 9 |
|
| 10 |
Print this page