
Extrication Tips: January 2013
Randy Schmitz
Features Extrication TrainingIn the October 2012 issue of Canadian Firefighter and EMS Quarterly, we focused on the First Responder Jack (FRJ). Now let’s look at uses for the FRJ in a rescue application.
In the October 2012 issue of Canadian Firefighter and EMS Quarterly, we focused on the First Responder Jack (FRJ). Now let’s look at uses for the FRJ in a rescue application.
First, an inspection for lubrication, wear, and missing or damaged parts is necessary. Check the steel bar to make sure it is straight, and make sure the climbing pins are not worn and have been properly lubricated with light-penetrating oil, Teflon or silicon spray. Do not use regular motor oil or grease to lubricate the jack components. Also, check to make sure that the jack is clean and free of mud and dirt. If the moving parts of the jack or the steel bar are clogged, use air pressure, water pressure or a stiff brush to clean them. Use a non-flammable cleaning solvent or another good degreaser to clean the jack. Remove any existing rust, preferably with a penetrating lubricant.
Never use the jack to support or stabilize a load without the proper cribbing. Always block up the load that is being lifted and follow the Golden Rule: lift an inch, crib an inch. If the jack has chains attached to either the running nose or the base plate, make sure that the chain is grade 80 or better and that it is no smaller than eight millimetres (5/16 of an inch). Remember that the load rating for the chain, cribbing and straps must be equal to or greater than the load rating of the jack, which is 2,114 kilograms (4,660 pounds).
The following parts require lubrication: the standard steel bar, the Pitman arm, the springs, the shear bolt and the climbing pins. Please refer to the owner’s manual for clarity and location of these parts.
 |
|
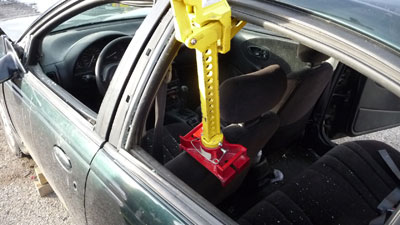
| Photo 1: For seatback relocation, place the First Responder Jack base plate on the outside corner of the seatback and insert hard protection between the patient and the tool. Photos by Tim Llewellyn |
|
 |
|
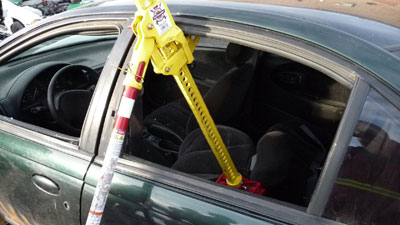
| Photo 2: The lifting nose, or runner, is then moved upward until it comes in contact with the roof rail inside the window frame of the door. |
|
 |
|
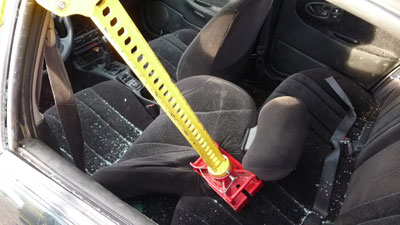
| Photo 3: Engage the handle and slowly force the seatback downward until it is relocated to the rear seat cushion. |
|
 |
|
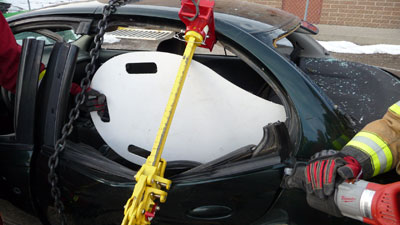
| Photo 4: For total side-wall removal, a reciprocating saw or an air chisel can be used to sever the Nader pin, which will release the door and allow it to be forced open. |
|
 |
|
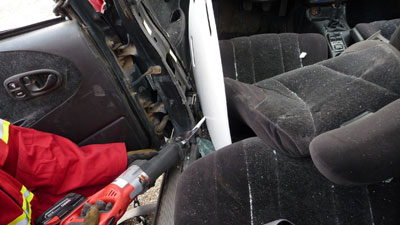
| Photo 5: Ensure that all trim is removed and avoid cutting into the seatbelt pretensioner, which is usually located in this area. |
|
 |
|
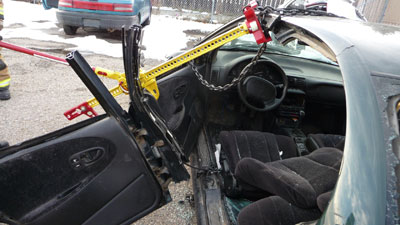
| Photo 6: Additional force may have to be applied with the FRJ inserted into the driver’s door window area to continue to spread and create space as the B-pillar is being severed. |
|
 |
|
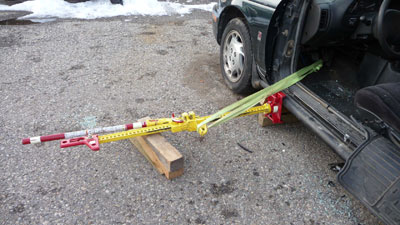
| Photo 7: To rescue a patient from brake-pedal entrapment, carefully engage the lifting handle to apply force and bend the pedal away from the patient in the foot-well area. |
|
 |
|
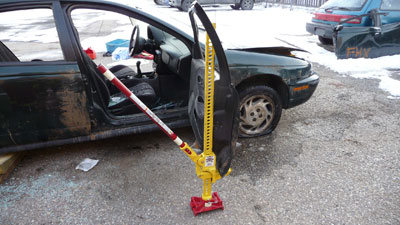
| Photo 8: Insert the FRJ at the edge of the open door, and place the lifting runner under the corner. |
|
 |
|
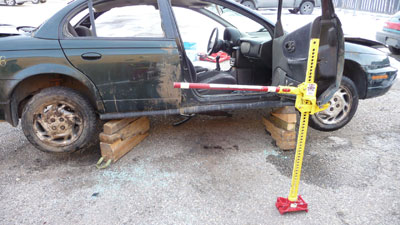
| Photo 9: Because the door hinges are extremely strong, a lot of space can be created between the ground and the bottom of the vehicle where the patient is trapped. |
Seatback relocation
Depending on the severity of a motor-vehicle collision, rescuers may need to take spinal precautions for the patient. Often, the decision is made to remove the patient applying the least amount of spinal manipulation possible, and thus, egress is usually accomplished by reclining the seatback downward and laying the patient onto a spine board, then removing the patient out the back of the vehicle, in a straight line.
For this to happen, the seatback must be operational and must not have been damaged in the collision. In some cases, the seatback must be reclined electronically. However, if battery power has been either removed by cutting the negative and positive 12-volt cables, or destroyed as a result of a crash, reclining the seat on its own power may not be an option.
First, place the FRJ base plate on the outside corner of the seatback and insert hard protection between the patient and the tool (see photo 1). The lifting nose, or runner, is then moved upward until it comes in contact with the roof rail inside the window frame of the door (see photo 2). Engage the handle and slowly force the seatback downward until it is relocated to the rear seat cushion (see photo 3). The patient will remain in the seated position and be held there by the medical team. With the seatback reclined, the FRJ can be removed. This provides more space for sliding a spine board in through the rear window. Insert the foot end of the board underneath the patient so you can lay the patient onto the board.
Total side-wall removal
In a side-impact collision, in which the side of the vehicle traps the patient, the removal of the rear door, B-pillar and driver’s door can often be done in a few short steps.
Starting from the rear-door area, insert the FRJ with the base gripping the roof rail and window frame, and the lifting nose placed on top of the doorsill.
Secure the FRJ with a rope, webbing or a strap – the rope will prevent the FRJ from slipping off the window frame during the operation. Engage the jack handle to apply downward pressure to the door; this will create a space between the edge of the door and the Nader pin. At this point, cut the top of the B-pillar to take the pressure off of the patient, and continue to operate the handle and force the side of the vehicle farther away.
Once sufficient space is created, a reciprocating saw or an air chisel can be used to sever the Nader pin, which will release the door and allow it to be forced open (see photo 4). The window frame can also be cut before engaging the jack handle; this helps to reduce the effort required to release the door.
The next step is to insert the reciprocating saw or air chisel at the bottom of the B-pillar and cut the B-pillar away from the rocker panel. Ensure that all trim is removed and avoid cutting into the seatbelt pretensioner, which is usually located in this area (see photo 5). Additional force may have to be applied with the FRJ inserted into the driver’s door window area to continue to spread and create space as the B-pillar is being severed (see photo 6). The whole side section can now be rotated using the driver’s front door hinges. Cover all sharp edges before removing the patient.
Brake-pedal entrapment
Remove driver’s door, build a crib platform to support the FRJ in a 90-degree position, and rotate the base plate so it will accommodate the rocker panel. Use webbing with a girth hitch or attach a rope to the lifting runner and the other end to the brake pedal. Carefully engage the lifting handle to apply force and bend the pedal away from the patient in the foot-well area (see photo 7).
Patient removal from under a vehicle
Occasionally, pedestrians are run over by vehicles and remain underneath. Depending on the location of the patient, it may be beneficial to use an FRJ to lift the vehicle off the patient to create space for removal.
Due to the rounded shape of a vehicle, lifting directly from the lower rocker panel may cause the vehicle to slip off the jack, as an angle is created from the lifting height. If it is not safe to lift off the front or rear bumper, then open the door to 90 degrees and apply a bit of force against the hinges to keep the door open. Insert the FRJ at the edge of the open door and place the lifting runner under the corner, as shown in photo 8. Engage the handle. Because the door hinges are extremely strong, a significant amount of space can be created between the ground and the bottom of the vehicle where the patient is trapped (see photo 9) This evolution is very quick to employ; however, the lift-an-inch, crib-an-inch principle must be used in case of a load failure or for protection if the jack were to slip off. An alternative is to insert the lifting nose into the wheel well on the side of the vehicle from which the patient will be removed. Again, be extremely mindful of the angle created so that the vehicle doesn’t slip off the end of the lifting runner.
These options are to be used when no other hydraulic tools are available; for example, in instances of equipment failure, or when there is multiple-vehicle entrapment and other tools must be used to quickly extricate patients who are in critical condition. These options will not work on all vehicles or at all crashes, but knowing what is possible in certain situations gives rescuers more confidence to get the job done.
Randy Schmitz is a Calgary firefighter who has been extensively involved in the extrication field for 19 years. He is an extrication instructor and has competed internationally. He is the education chair for Transport Emergency Rescue Committee (T.E.R.C.) in Canada, a T.E.R.C. International extrication judge and a tester and evaluator for manufactured prototype products for extrication equipment. He can be reached at rwschmitz@shaw.ca. Follow him on Twitter at @firedog7
Print this page