Extrication Tips: April 2014
Randy Schmitz
Features Extrication TrainingIn the January issue of Canadian Firefighter and EMS Quarterly, we looked at methods and tools that save time when removing patients who have been involved in motor vehicle collisions.
In the January issue of Canadian Firefighter and EMS Quarterly, we looked at methods and tools that save time when removing patients who have been involved in motor vehicle collisions. Trauma patients who receive medical attention in the shortest possible time have an increased chance of survival. Since some injuries can cause a trauma patient’s condition to deteriorate extremely rapidly, the time between injury and treatment should be kept to a minimum.
The mechanism of injury is a key factor that alerts rescuers to the potential need for prompt access to and removal of the patient. Critical interventions performed in the first 10 minutes on scene can have great benefits for the patient. However, first responders must know when and how to remove patients involved in motor vehicle incidents in order to reduce mortality and provide optimum care in the pre-hospital setting. However, rapid extrication should be carried out only when time is a factor and not because of personal preference.
With the supplemental restraint systems in vehicles today, rescuers must disconnect power sources to render the systems safer to work around. Disconnecting the power source presents its own specific set of problems, as locating a 12-volt battery for shutdown in today’s vehicles can be a time-consuming task. About 40 per cent of batteries are no longer located in the engine compartment as was typical in the past; searching for the battery adds precious time as responders must search the vehicle to find the power source.
Let’s not forget about the high-strength steel that is now used in vehicles to divert crash forces from the passenger compartment. This steel works well to protect the occupants but when the crash forces exceed the integrity limits of the metal, the people inside the vehicle may become pinned by the metal components and the vehicle structure. Rescuers are left hoping that hydraulic tools are capable of cutting the now-distorted metal to be able to relocate it and gain access to the patients. It takes time to circumvent these new issues, which, in turn, can make these innovations detrimental rather than beneficial to patients.
Use rapid extrication in the case of:
- Fire or immediate danger of fire
- Danger of explosion
- Continued exposure to toxic environment and the potential for a hazmat incident
- Suspected shock
- Instances in which lifesaving methods cannot be performed where the patient is located; for example, patients who are in respiratory arrest or require CPR, severe atrial bleeding or anything that requires urgent surgical intervention
Rapid extrication procedure:
- If it is practical to do so, one rescuer stabilizes the cervical spine in a neutral and in-line position.
- Perform a rapid trauma survey, lasting less than one minute.
- Quickly apply a cervical collar – if time allows.
- Communicate that a rapid extrication is taking place. Cut or remove the seatbelt at the patient’s lap and torso.
- Support the torso while the seatback is relocated.
- Insert the tail end of the backboard under the patient’s buttocks.
- If personnel are available, disentangle the patient’s lower extremities and move as directed.
- Stabilize the cervical spine as much as possible while moving the patient out of the vehicle, then carefully slide and position the patient onto the backboard.
- Direct the patient’s movement to a safe location.
- Ensure the patient and first responders are away from any hazards before any resuscitation begins.
In the following scenario, rescuers gain quick access and unpin a trapped, critical patient who had to be immediately removed from a vehicle; we assume that the scene and the vehicle have been secured and are ready for tool work.
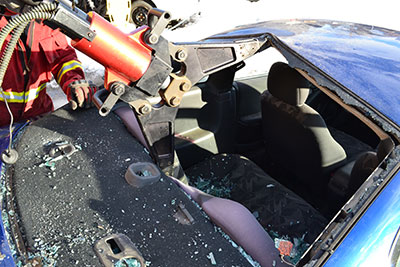
Rescuers should start by making entry through the rear of the vehicle to assess the patient. Remove the glass and use the hydraulic spreaders to open a space through which rescuers can enter and remove the patient. With one spreader tip in the centre of the trunk bulkhead and the other tip just catching the inside edge of the roof, fully open the spreaders; this will crush down the bulkhead and tent the centre of the roof to make a space that is roughly the distance that the spreaders will open, typically about 71 centimetres (28 inches). This should provide an acceptable opening through which any patient can be removed (see photo 1).
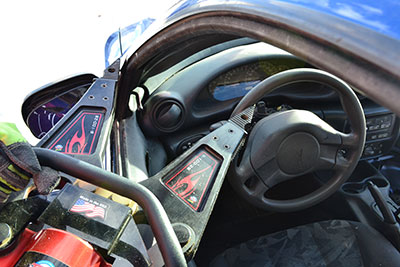
Let’s assume that the patient has been trapped by the steering wheel and that attempts to manually relocate the column have failed, or there isn’t quite enough space through which to remove the patient and a few extra centimetres are required. Start by opening the spreaders to a 40-centimetre (16-inch) space between the tips. Insert one tip just inside the left side of the steering wheel and then open the spreader tips enough so the opposite tip comes in contact with the outside edge of the A-pillar (see photo 2). Carefully start to close the tips and the steering wheel will start to move in the direction of pull; you may have to reposition the tool to get a good grip so it won’t slip off of the steering wheel. Slowly allow the spreader tips to close at an upward angle, which in turn creates space between the bottom of the steering wheel ring and the patient’s legs or torso. Be mindful that most steering wheels have an aluminum core about eight millimetres thick that will deform it is relocated. If rescuers attempt to move the steering wheel too far, the core may fail and lose the integrity required to move it any further, so relocate the steering wheel as little as possible.
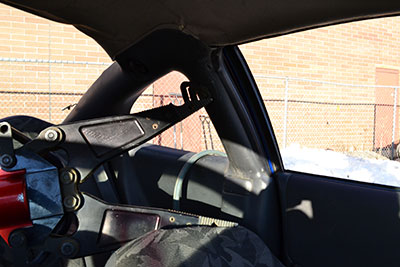
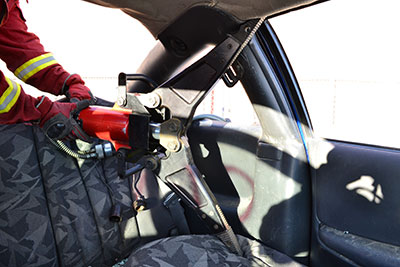
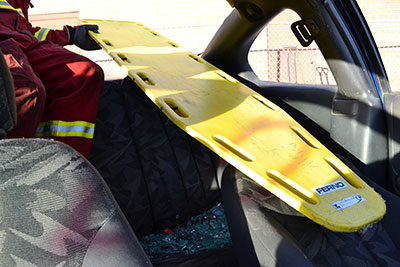
Now that the patient is unpinned, rescuers can concentrate on making the removal a simple process. Lay the seatback down so the backboard can be inserted from the rear window. This is not always an easy process – the seats may be electric and the battery destroyed, or the seatback may not recline manually due to crash damage. In this case, rescuers can use hydraulic tools to carefully and methodically relocate the seatback. Place one tip on the outer corner of the top of the seatback near the head rest; hard protection must be placed between the patient and the tool (the protection was removed for the photos). The other tip will make contact with the top of the roof rail where there the vehicle’s structure offers significant strength. The angle of the tool is paramount if the goal is to move the seatback downward and out of the way.
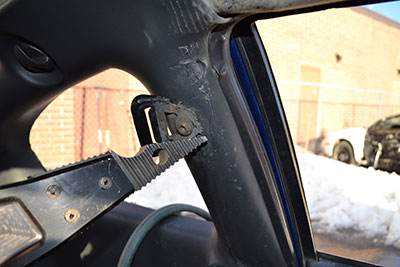
Slowly start to spread the seatback down and away from the patient (see photo 3). Rescuers will need to hold the patient’s torso in the upright position as the seatback will no longer be providing support; this can be done either from the passenger side – if it is not occupied by another passenger – or from outside the driver’s window area. If the spreader is at full capacity and the seatback still needs to be moved further downward, the tool can be retracted just enough to be placed on the driver’s seatbelt anchor bolt that is attached to the B-pillar (see photo 4). This very strong, Grade 8 or better bolt is more than capable of supporting the tip of the spreader to provide that extra distance when the spreader tips are again opened up to finish laying the seatback almost flat (see photo 5). At this time, the head rest can also be removed. This should provide ample room to insert a backboard and lay the patient on it to remove him or her from the vehicle (see photo 6).
Rescuers must practise this manoeuvre in a controlled training environment in order to understand tool placement and mechanical advantage, rather than trying it in a real rescue situation and have it fail. Remember, different vehicle brands, models and styles can react differently, as can different makes and models of hydraulic tools.
Randy Schmitz is a Calgary firefighter who has been extensively involved in the extrication field for 22 years. He is an extrication instructor and has competed internationally. He is the education chair for Transport Emergency Rescue Committee (T.E.R.C.) in Canada, a T.E.R.C. & WRO International extrication judge and a tester and evaluator for manufactured prototype products for extrication equipment. He can be reached at rwschmitz@shaw.ca. Follow him on Twitter at @firedog7
Print this page
