
Extrication Tips July 2010
Randy Schmitz
Features Extrication TrainingIn part 2 of big rig rescue in April we talked about arrival, inner and outer surveys, hazard control stabilization and interior rescuer duties once inside the cab. Here, our focus is on disentanglement, lifting options and procedures to gain access to the involved vehicles.
In part 2 of big rig rescue in April we talked about arrival, inner and outer surveys, hazard control stabilization and interior rescuer duties once inside the cab.
Here, our focus is on disentanglement, lifting options and procedures to gain access to the involved vehicles.
|
Large truck cab extrication
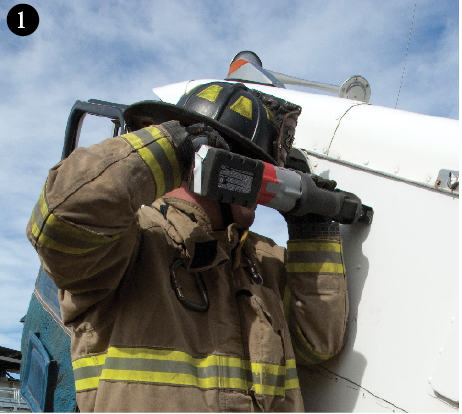
One problem with large cab extrications that rescuers must overcome is the height of the vehicles. Whether the truck is upright or on its side, rescuers must use makeshift platforms, ladders and truck beds to deal with this height obstacle and to ensure a safe working environment. Ladders leaned up against the truck are poor working platforms on which to use heavy hydraulic spreaders or cutters; consider using a light-weight combi-tool for working over head and use stepladders if possible. Contemplate building a platform out of cribbing and a ladder, and cover the platform with a backboard to gain extra height. (See photo 1.) Creating removal space for patient egress depends on the location of the patient and the degree of entrapment.
Gaining entry
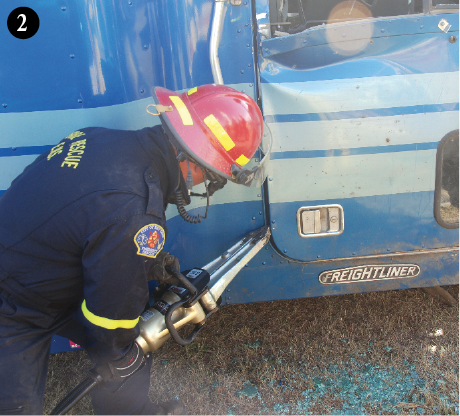
The most obvious entry and egress point is the door of the cab; as always, try before you pry. Spreading heavy truck doors open requires a slightly different technique than working on standard automobile doors. The heavier construction contributes to less flexibility when making purchase points. A good starting location is the lower corner of the door close to the handle; however, don’t assume this is where the Nader and latching mechanism are located; they will generally be closer to the top of the door sill. Operating heavy spreaders above shoulder height to get closer to the latch is not only cumbersome but also dangerous.
|
Be aware that on some truck cabs there may be an exhaust stack in the way of using hydraulic spreaders to spread open the door. In these cases a hinge-side attack may be the best approach. Some older trucks with exposed hinges on the outside allow a hydraulic cutter to easily sever the hinges with one cut. Piano style hinges will run the length of the entire door, therefore a reciprocating saw or a high-quality air chisel may be the tool of choice to make the cut. Door size up, understanding the construction, tool knowledge and rescuer mobility will help determine the proper method of safely breaching and removing truck cab doors. (See photo 2.)
When a truck has come to rest on its side, door removal is no longer the preferred option; often the large windshield can be used for egress.
Remove the laminated glass by either cutting out the rubber gasket or using standard glass removal tools and techniques if the glass is glued in place. More space may need to be created for entry into the cab if accessing patients through the windshield area. A telescopic ram may need to be placed between the top of the firewall and the edge of the roof initially to make room for entry. If placed in the centre of the firewall the force of the ram will create a tenting effect to facilitate entry space.
Frequently, drivers/passengers of the truck will be found piled on top of each other at the bottom of the cab, which makes it difficult and risky to simply cut the roof off or flap it, as patients may be leaning up against it in compromising positions. Ramming the roof in strategic locations will allow rescuers to create the required space to insert tools that can then cut sections of the roof to gain enough egress space. Cribbing must be inserted underneath structural areas of cab when removing sections of the roof to minimize movement and maintain any structural integrity the cab may have left.
|
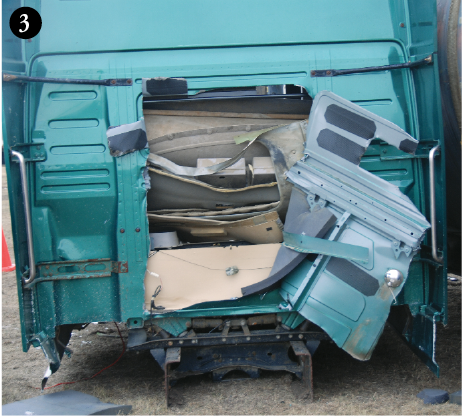
Another option for access/egress is breaching the rear of the sleeper or cab. These areas are generally made of lightweight material such as sheet metal aluminum, fibreglass or Metton, and cosmetic interior material such as leather, insulation, plastic and foam. If dealing with a sleeper unit, a quick inspection is needed to ensure that the area to be cut open does not have closets, bunks or shelving attached to it. If aluminum framework is found behind the outer skin, hydraulic cutters will make short work of any structural ribs once the outer material is removed. A dead giveaway for framework is rivets in a straight line, spaced evenly apart, that are visible on the exterior skin. (See photo 3.)
Upright cab procedures
In an upright truck cab with entrapment, removal of seat backs, pedals, gear shifter and steering wheel, and lifting of the dash, may need to be undertaken.
Always attempt to create space by using built-in mechanisms to your advantage.
Lower the air-activated seats via the red button on the side of the seat if it is operational. Remember that a pneumatically controlled driver’s seat can lift up as much as 15 centimetres (six inches) as the patient’s weight is removed; to counteract this you must recline the seat back and tilt the steering wheel upward. Truck steering wheels are much larger than those in passenger vehicles, so entrapment issues are more likely. If space is limited, cutting the steering wheel ring away from your patient can be done with a hydraulic pedal cutter.
|
|
 |
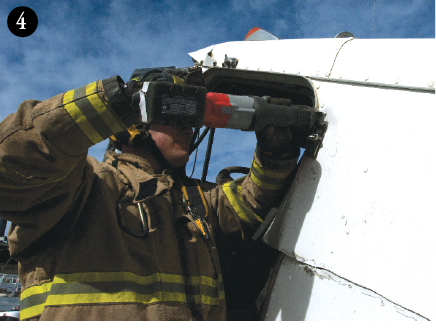
If access through the sleeper is not an option, consider cutting a third door or the side of the truck behind the driver or passenger door. This will require a reciprocating saw or air chisel to remove the section of the metal and possibly some aluminum framework to create enough removal space for your patient, basically creating a three-sided cut that resembles a very large door. (See photo 4.)
Dash lifts
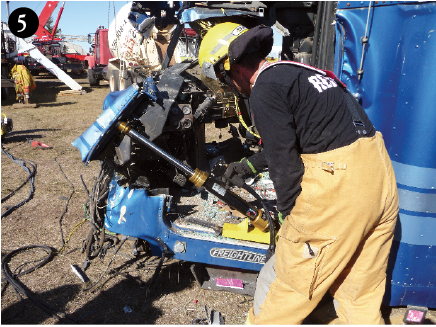
Dash lift evolutions are similar to those of passenger vehicles for lower extremity entrapments. Design and construction will differ slightly between conventional, cab-forward and cab-over types, but careful examination of the structures will allow for the appropriate cuts to be considered and executed. The same principles apply when attempting to remove the strength of the structures that are causing the entrapment. Relief cuts are strategically placed to allow for upward or forward movement of the firewall and front dash area. Once the A-pillar has been cut and a hydraulic ram placed in the door space at an angle, force can be applied and the firewall area will start to move off the patient’s trapped extremities. (See photo 5.) There may be some resistance due the severity of the crumpled metal, so continue the relief cut horizontally with a reciprocating saw where the metal has started to tear towards the steering column. This should weaken the structure enough to create the desired space. On a conventional cab, once the fibreglass hood is removed, support beams are attached to the radiator and extend back to the firewall. These will need to be cut to reduce the resistance when relocating the firewall. If severe entrapment is encountered, successfully moving the dashboard or firewall is often dependent on severing the main support beam that runs from the driver’s door to the passenger’s door away from the rest of the cab. This will also require numerous cuts to help displace the beam; however, any cuts made to the beam will make the displacement effort easier. Remember that when cutting near the firewall or dashboard area, there may be hot engine coolant from the heater core if it has been breached. Patient removal from an upright truck cab will be cumbersome at best. Once they are carefully placed onto a backboard, a collapsible style ladder can be set up at a slight downward angle and used as a platform. This will allow you to carefully slide the patient down to a height that can accommodate a proper lift and carry of the packaged patient, who can then be passed to rescuers on the ground.
 |
Under-ride extrication
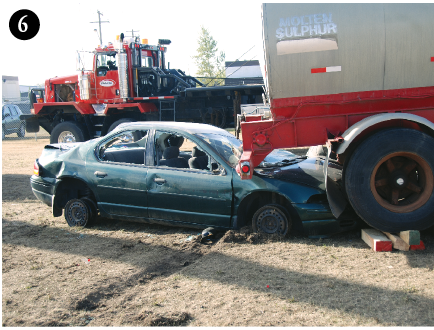
As mentioned in part 2, smaller passenger vehicles are often entrapped underneath the truck or cargo trailer. Side under-rides happen when a passenger vehicle becomes lodged underneath the bottom trailer and the roadway that has approached at 90 degrees to the trailer or cargo hauler. With rear under-rides, severe entrapment can occur if a vehicle impacts the rear of the trailer at a high rate of speed from following too close. As mentioned in part 2, rear impact guards that are installed on the back of semi trailers have been mandatory since 1998. They are designed to stop passenger vehicles from under-riding; however, they are only effective at impact speeds of roughly 50 kilometres/h (30 miles/h) or less. The downside is that under-rides can create a wedge effect of the vehicle under the trailer in a crash. These types of under-ride crashes significantly reduce the survival space left inside a passenger vehicle. With the increase in fuel-efficient vehicles that ride much lower to the ground, it is likely we will see an increase of severely trapped occupants in rear under-ride accidents in the near future. (See photo 6.)
Lifting options
Advances in technology have not left the cargo trailer industry untouched. As rescuers, we can use this technology to our advantage in rescue situations.
|
|
 |
|
 |
|
 |
|
 |
|
 |
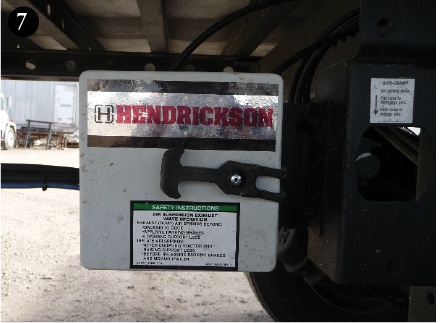
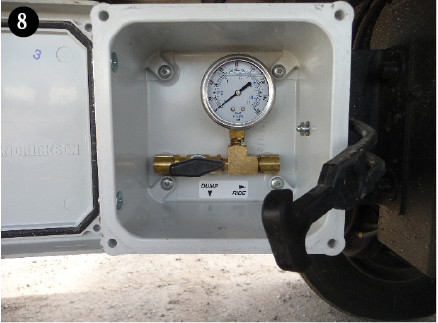
One such advantage can be to use the air-ride-suspension system of a modern trailer to lift it off a vehicle that is wedged underneath. This will create space for removal of the vehicle or allow enough space to spread or cut off vehicle parts to extricate patients. Near the air suspension exhaust valve, usually found in a small box on the outside of the trailer (near the rear wheels), there will be a switch or lever that allows an operator to manually exhaust or inflate the air suspension. (See photos 7 and 8.)
This will either lower (dump) the trailer to the ground or raise (ride) the trailer higher off the ground. By inflating the air spring suspension the ride height of the trailer can increase as much as seven to 12 centimetres (three to five inches) according to most trailer manufacturers. This increase in height may be just enough to release a trapped vehicle or allow for door/roof removal for patient extrication. One very important safety issue to note with roughly 70 per cent of recently manufactured air-ride suspension cargo trailers; air will automatically exhaust out of the system in five to 10 seconds once the trailer parking brake is pulled, thus lowering the ride height of the trailer as much as seven centimetres (three inches) on to the vehicle wedged underneath the trailer. This new technology is referred to as an “Automatic Dump Valve system”. The best solution in this case would be to simply chock the rear wheels and leave the trailer parking brake off.
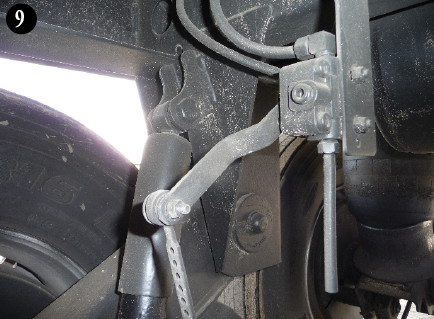
If the “dump/ride” valve mechanism is damaged or not accessible due to the crash, it is possible to bypass that portion of the system and locate the Height Control Valve between the rear tires and axles. Loosing off the linkage band and manipulating the valve arm upward (called the fill position), will allow air to enter the system and inflate the air-ride suspension. (See photo 9.)
Creating space
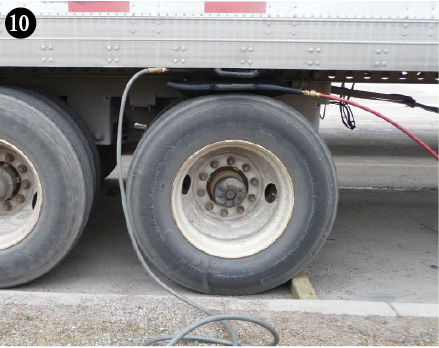
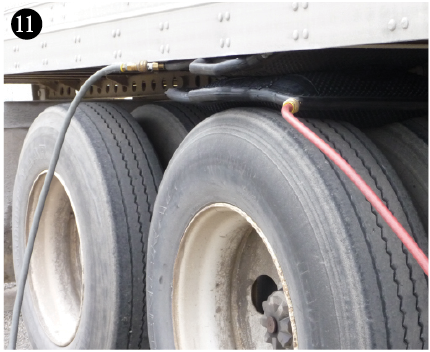
Another rapid and effective lifting option is to place two large rescue lifting bags in the space between the top of the trailer’s rear tires and the bottom of the trailer frame (See photos 10 and 11.)
As the rescue lift bags are inflated, one side of the trailer will start to lift up and tilt, creating space between the trailer and the ground (up to as much a 20 centimetres or eight inches) and gaining precious room to perform either a removal of the vehicle or other extrication evolutions such as a trunk tunnel (see CFF April 2007).
This option can be peformed on either air-ride or leaf-spring suspension trailers. As always, the golden rule applies: lift an inch, crib an inch. To reduce the amount of cribbing to support the lift, place cribbing on the tire next to the lifting bags and simply fill the void between the top of the tire and bottom of the trailer framework. Or block between the ground and the rear impact guard as this space will be minimal and require less cribbing material.
Depending on the situation, deploy landing gear, release the fifth-wheel, and always chock the tires with blocking or manufactured wheel chocks. Monitor all suspension components for potential failure as the lift procedure is taking place. And be prepared to “freeze” the situation until adjustments can be made.
Other helpful under-ride tips
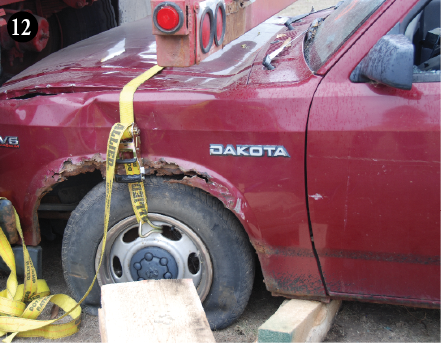
Here is another tip to reduce the amount of clearance needed between a under-ridden vehicle and a trailer called the “ratchet strap suspension lock down.” (See photo 12. )
When a vehicle under-rides a trailer, the smaller vehicle’s suspension will be compressed to the maximum. Prior to creating space between the trailer and the ground, attach a heavy-duty ratchet strap from one tire to the opposite tire over the hood or through the vehicles interior at the dash level. This will help keep the vehicle’s suspension from rising up with the trailer as it is lifted and impeding efforts. Once the desired space is achieved and extrication procedures executed, the ratchet strapped suspension can be released as needed.
The methods, options and considerations outlined here and in the previous two issues should lay some basic groundwork for understanding and adapting to large truck extrication.
In the next issue we will have a multiple choice quiz that covers the information and content of what we learned over the three-part large truck extrication series.
Until then, train hard, train often!
Print this page