
Extrication Tips: July 2011
Randy Schmitz
Features Extrication TrainingMany of us have responded to calls at which patients are trapped inside their vehicles against trees, hydro poles or other vehicles. If rescuers could access victims from the damaged side of the vehicle, extrication could be a snap, but the only way to do that is to move the vehicle off the impinging object. Rescuers have been told for years never to move a vehicle with a victim inside. Generally, I agree with this concept but there are exceptions to every rule. However, extrication instructors do not want emergency responders to believe that the solution to pinned or trapped patients begins with moving the vehicle. Moving the vehicle is an option but it is the exception, not the rule.
Many of us have responded to calls at which patients are trapped inside their vehicles against trees, hydro poles or other vehicles. If rescuers could access victims from the damaged side of the vehicle, extrication could be a snap, but the only way to do that is to move the vehicle off the impinging object. Rescuers have been told for years never to move a vehicle with a victim inside. Generally, I agree with this concept but there are exceptions to every rule. However, extrication instructors do not want emergency responders to believe that the solution to pinned or trapped patients begins with moving the vehicle. Moving the vehicle is an option but it is the exception, not the rule.
When is it appropriate to consider moving a vehicle with a patient inside? A lot of extrications seem to have gone well without having to do this, but was it an option at the time? Should rescuers consider this option earlier in the extrication process? What if the patient’s condition takes a turn for the worse and requires rapid extrication?
 |
|
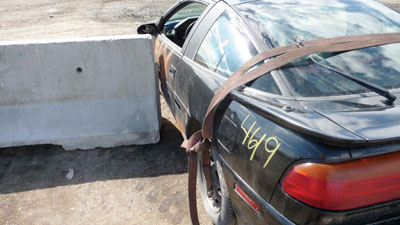
| Photo 1: Generally, vehicles with victims trapped inside should never be moved, but under special circumstances where rapid extrication is required, moving the vehicle is an option. |
|
 |
|
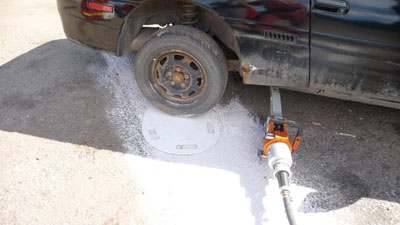
| Photo 2: Place a flat object, such as a piece of Lexan plastic or even a back board, underneath the tire as a slide mechanism, and apply absorbent material to reduce friction. |
|
 |
|
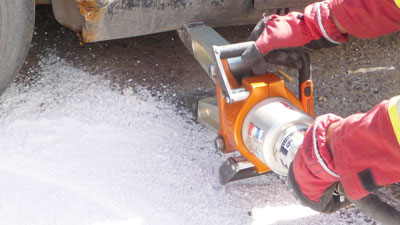
| Photo 3: Place the hydraulic spreader near the lower rocker panel and slightly lift the rear of the vehicle to easily insert the puck board to protect the bottom of the tire from the pavement. |
|
 |
|
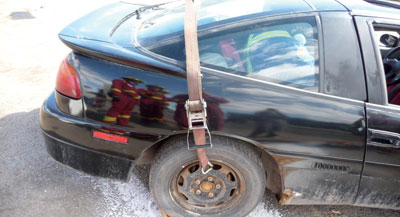
| Photo 4: Hook the ratchet strap from one rear tire, over the trunk to the other rear tire to reduce the distance the vehicle will have to be lifted to insert the puck board. |
|
 |
|
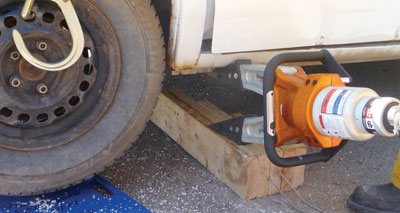
| Photo 5: Place a step chock on its side to keep the hydraulic spreader off the ground and avoid damage. |
|
 |
|
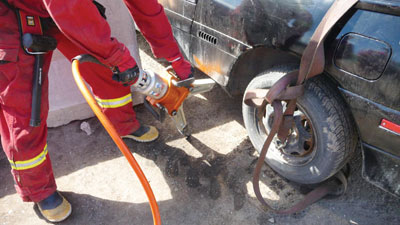
| Photo 6: Position the hydraulic spreader at a 45-degree angle in the direction you want the vehicle to move. Slowly open the spreader arms to push the vehicle away from the object. (Photos by Randy Schmitz) |
Rapid extrication
Rapid extrication refers to a life-over-limb situation. A proper definition of rapid extrication is the removal of a patient as quickly and safely as possible from a harmful environment or a life-threatening situation, using the maximum packaging and stabilization that the situation will allow. Rapid extrication, which is also called load and go, is based on the victim’s condition. Life-threatening injuries necessitate rapid extrication, which should include manual spinal immobilization, the loading of the patient on a backboard, and transportation of the patient, ideally within 10 minutes of arriving on scene.
A vehicle with live patients inside can be moved in a controlled manner. This has often been done in under-ride type situations with semi-trailers, but how far can rescuers go with this notion? If the extrication path you choose for your patient is estimated to between 25 and 30 minutes and medical personnel are suggesting the patient may succumb to injuries before then, what have you got to lose? If moving a vehicle to allow access to the impacted side reduces the extrication time by 15 minutes, isn’t it worth a try? Rescuers also cannot forget that they may need to create space on the impacted side away from an object, just to push out metal that is trapping the patient’s feet, legs or head. Rescuers can’t remove a patient whose arm is caught between the seat, with a door and then a pole on the other side.
The photos, from a simulated crash, show a vehicle that has hit a concrete barrier (see photo 1). We’ll assume that there is a patient trapped in the driver’s seat with head, shoulder, pelvic and rib injuries on the left side, and who must be removed from the vehicle immediately due to the severity of the injuries; this situation warrants rapid removal or a load-and-go protocol. As always, perform scene safety, provide initial vehicle stabilization for medical personnel entry, do a complete patient assessment, and an electrical system shutdown.
The first step is to assess which end of the vehicle will be moved away from the impending object. This depends whether the impact is closer to the engine end or rear end of the vehicle. In this case, we will attempt to slide the rear of the vehicle away from the barrier, because that end of the car will be lighter and easier to move. This will also give us a good spot at which to position our hydraulic tools.
Step two requires a hydraulic spreader, a five-centimetre, 1,360-kilogram-rated ratchet strap, absorbent material (or an equivalent substance) to reduce friction, a flat object (such as a piece of Lexan or puck board or a back board), and a scoop shovel (see photo 2).
The rescuers’ goal is to transfer the vehicle’s weight to the passenger-side rear tire and use the tire as a slide mechanism to carefully move the vehicle. The absorbent material shown in photo 2 will act like tiny ball bearings or pebbles underneath the tire to reduce the friction from the rubber tire and the underlying surface. Apply the absorbant material at an angle in the direction to which the rear end of the vehicle is likely to move, in an area 1.5 to two metres long and half a metre wide.
Next, place the hydraulic spreader as close as possible to the passenger rear tire. Insert the spreader tips near the lower rocker panel to slightly lift the back of the vehicle and allow the thin, puck board to be easily inserted between the bottom of the tire and the friction-reducing material and the ground/pavement (see photo 3).
Before lifting the rear tire off the ground, you may consider hooking the five-centimetre ratchet strap from one rear tire to the other in slots of the rim, and ratcheting the suspension system in its current position to lock the vehicle in place. This will ensure the suspension travels with the body of the car and will minimize the distance the rear of the vehicle will have to be lifted so the puck board can be inserted under the tire (shown in photo 4). If the space between the rocker and the ground/pavement is significant, you may insert a step chock on its side (see photo 5) and place the spreader tips on top of the chock to reduce the distance.
Open the spreader tips slowly to make contact with the rocker panel and the ground/pavement. Carefully and slowly start to lift at the rocker panel area and continue until there is just enough room to slide the puck board/hard protection under the tire. Do not allow the tool to twist and slip off the rocker panel, as this will cause unwanted movement to your patient. Slowly let the spreader arms close together, letting the rear tire back down onto the puck board.
Next, reposition the operator and the spreader at the rocker area near the driver-side rear tire on the impacted side of the vehicle. This time, instead of actually lifting the rear of the vehicle, orientate the hydraulic spreader at a 45-degree angle and in the direction you want the vehicle to move (see photo 6). This orientation will push the vehicle forward rather than upward. Position the top spreader tip against the rocker and the bottom tip on the ground/pavement. Carefully and slowly start to open up the spreader arms and push the vehicle away from the impacted object. Continue to push to a point where the arms of the spreader are fully extended or you anticipate the spreader tips will start to slip off the rocker panel or ground/pavement. Stop, slowly retract spreader arms, monitor for any unwanted jarring movements, and continue the process until the vehicle has moved enough so that there is space between the impacted object and the vehicle.
At this point, rescuers can start working to extricate the patient, either by removing the vehicle’s components, such as doors or B-pillars, or by pushing the impacted side back to its near-original, pre-engineered state.
A few points to consider:
Have a pair of eyes watching for unwanted movement at the impacted side through the entire evolution.
- When releasing or retracting the spreader arms, do so very carefully. The spreader is under load and being too hasty may cause unwanted movement.
- Point or orient the hydraulic spreader in the direction you want the rear of the vehicle to go; a 90-degree position against the vehicle may not result in much movement before the spreader tips will want to slip off, or the tool may twist and damage the spreader arms.
- Ensure a proper angle of the spreader to the ground/pavement when sliding the vehicle; if the angle is too great you will lift rather than push the vehicle away from the impacted object.
- Practise, learn and understand the principles, benefits and pitfalls in a training simulation prior to the real life applications.
This evolution is an advanced technique and should not be undertaken unless the operator has a thorough understanding of hydraulic tools and potential tool reaction, and can fully anticipate when to stop or reposition the hydraulic tool in order to avoid damaging it.
This technique is to be used in special situations only. Once comfortable and competent with this evolution, a skilled operator should be able to put a glass of water on the hood of the vehicle and perform the exercise without spilling a drop! Remember: practise, practise, practise!
Stay safe!
Randy Schmitz is a Calgary firefighter who has been extensively involved in the extrication field for 18 years. He is an extrication instructor and has competed internationally. He can be reached at rwschmitz@shaw.ca.
Print this page