
Extrication Tips: October 2011
Randy Schmitz
Features Extrication TrainingIn my last Extrication Tips column, in July, the focus was on moving a vehicle to access a victim.
In my last Extrication Tips column, in July, the focus was on moving a vehicle to access a victim. The column dealt with a vehicle that had crashed into a fixed object (such as a power pole, light standard or tree) and the solution was to carefully move the vehicle to access the severely impacted side. This time we will focus on options and tips to disentangle the patient(s) safely after we have moved the vehicle and are ready to extricate.
Side-impact crashes are one of the most common types of serious accidents and are often the most deadly. However, in a typical head-on collision involving a modern vehicle, the design of the vehicle absorbs crash forces and dissipates that energy through crumple zones that are engineered into the front rails, the framework and other parts of the vehicle, keeping the crushing effect away from the passenger compartment and protecting the occupants.
This energy dissipation takes place over a large surface area that encompasses the front bumper, the entire engine compartment, the firewall and the dashboard. This area is considered valuable real estate, so to speak, that affords this crash-force engineering some time and distance to absorb energy and do its job. From start to finish, frontal- and side-impact crashes happen in milliseconds, and the crash energy must be slowed down or absorbed to minimize impact on the patient. In frontal crashes, there is more space or reserve to absorb the energy, but in a side-impact crash, there is an extremely small distance – usually only a few inches or even centimetres – from the outside of the vehicle’s doors/B-pillars to where the occupants are seated. When crush space is so limited, side-impact crashes can be lethal.
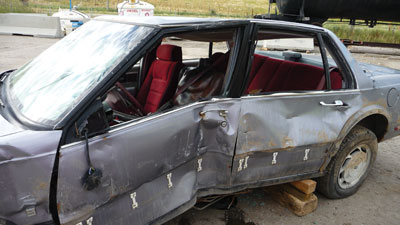
With the side structure of the vehicle severely deformed and impinging on the patient, any movement is going to aggravate the patient’s injuries (see photo 1). Our first priority is to minimize that movement to the best of our ability by ensuring that tools are correctly placed and by creating space between the patient and the interior side of the front and rear doors/B-pillar. Cross-ramming has been discussed before and proves to this day to be a good alternative to creating space from inside the vehicle. This option warrants a clear path and good access from behind the front occupants’ seats. If the vehicle has patients in the rear seating area, it becomes difficult to perform the cross-ramming evolution safely and effectively because of the limited working space. We will discuss another way to create space inside the occupant area while working from the outside of the vehicle.
 |
|
| Photo 1: Side-impact crashes usually leave the vehicle severely deformed and any movement may worsen the patient’s injuries. Photos by Randy Schmitz |
|
 |
|
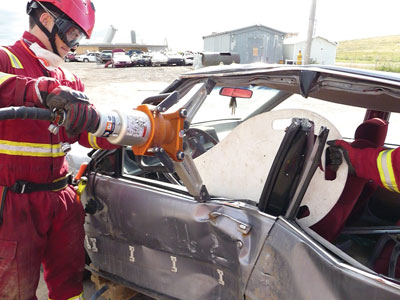
| Photo 2: Opening the spreader arms creates more space between the patient and the side structure by forcing the metal down and away. |
|
 |
|
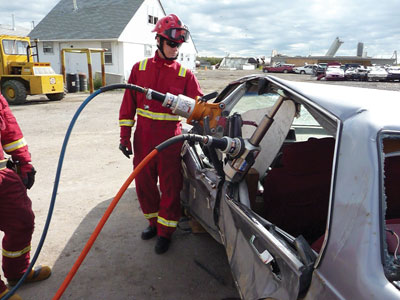
| Photo 3: Insert a mini ram on the opposing side of the spreader to continue the relocation of the doors and B-pillar. | |
 |
|
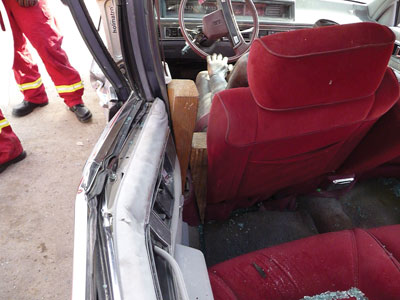
| Photo 4: Insert a cribbing wedge between the seat bracket and the B-pillar prior to removing the mini ram or spreader to minimize spring-back of the side structure onto the patient once the tools are relocated or removed. |
|
 |
|
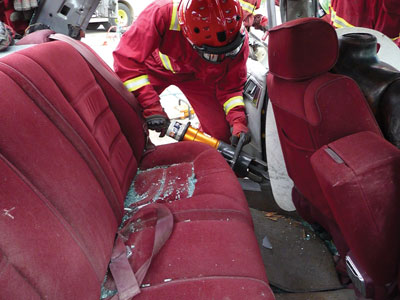
| Photo 5: Once the rear door has been forced open to roughly a 90-degree angle, make another relief cut parallel to the rocker panel at the bottom of the B-pillar. |
|
 |
|
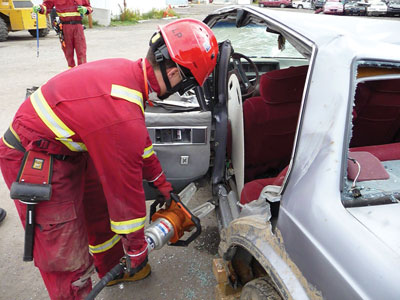
| Photo 6: Place the spreader tips on the rocker panel and the lower rear door hinge and spread the B-pillar until it tears off at the spot welds attached to the rocker panel. |
|
 |
|
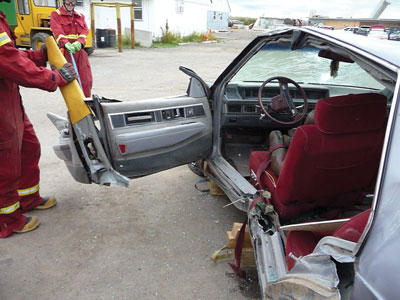
| Photo 7: The rear door, B-pillar and front door should now be rotated toward the front of the vehicle via front door hinges, creating a large access and removal point. |
|
 |
|
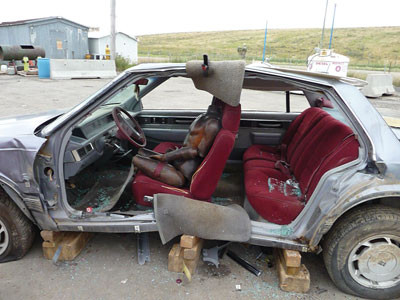
| Photo 8: Use the vehicle’s floor mats or pieces of an old, large-diameter hose to cover all sharp edges created by your cutting efforts. |
As always, the evolution takes place after size-up, scene safety, vehicle stabilization, electrical system shutdown and interior trim stripping. Step 1 is to decide where to place your hydraulic spreader to offer the most effective metal relocation. The degree and location of the intrusion and the position of the patient’s seat in relation to the B-pillar are a few determining factors. Larger occupants will generally be seated so that the upper torso is in line with the B-pillar or slightly behind it; smaller occupants are generally seated slightly forward of the B-pillar. Other considerations are the vehicle make and model, and the size of the B-pillar. In our case, most of the intrusion and impingement is forward of the B-pillar, so our initial efforts will be concentrated here.
Place the spreader with the tips near the roof rail and the top of the doorsill. Slowly open up the spreader arms enough to make contact and add a small amount of tension, enough to hold the tool in place. This is done for two reasons: firstly, so the energy from cutting the B-pillar with a hydraulic cutter is minimized, and secondly, because the spreader will not allow the impacting components to move any closer to the patient once the B-pillar is severed, as it is holding the side structure in its current position.
Another rescuer will then sever the top of the B-pillar as close to the roof rail as possible. If everything goes as planned, the impacting tension from the intrusion will be somewhat relieved and will start to ease off of the patient. Continuing to open the spreader arms will create more space between the patient and the side structure by forcing the metal down and away as the spreader arms open in an arc-type pattern (see photo 2).
Be aware of the limits of your spreading tool; most spreaders have a maximum opening distance of about 70 centimetres (28 inches). The space created may not provide enough clearance to safely remove the patient, so a mini ram should be ready to be inserted on the opposing side of the spreader to continue the relocation of the doors and B-pillar (see photo 3).
Prior to removing either the spreader or the mini ram, a cribbing wedge should be inserted between the seat bracket and the B-pillar if possible to minimize spring-back of the side structure onto the patient once the tools are relocated or removed (see photo 4).
If possible, a rescuer should keep the hydraulic mini ram under tension in the space between the roof rail and top of the doorsills. If the rear door Nader pin is exposed enough from the relocation efforts, it should be cut with hydraulic cutters to allow the rear door to open. If not, further spreading may be required to expose the pin to allow the rescuer to make the cut.
After the rear door is forced open to approximately a 90-degree angle to the vehicle, make another relief cut parallel to the rocker panel at the bottom of the B-pillar (see photo 5). At this time, cribbing should be placed directly underneath the rocker panel to fill the space between the B-pillar and the underlying surface. This is done so the rocker panel will not move downward as you continue the spreading efforts.
Next, place the spreader tips on the rocker panel and the lower rear-door hinge (if possible) and spread the B-pillar until it tears off at the spot welds attached to the rocker panel (see photo 6).
The complete side structure, including the rear door, B-pillar and front door, should now be rotated toward the front of the vehicle via front door hinges and out of the way for greater access and easier removal (see photo 7).
Cover all sharp edges created by the cutting efforts. A convenient solution for covering sharp edges is to wrap the vehicle’s floor mats over the hazards. Old, large-diameter hose that has been cut into sections can also be used to cover sharp and exposed posts (see photo 8).
A few points to remember:
- Hard protection is essential – pay close attention to any toolwork being done in the proximity of patients and interior rescuers.
- Stripping away the plastic trim or fabric-covered material to expose potentially hidden hazards, such as undeployed, high-pressure roof curtains, cylinders and seatbelt pre-tensioners is a must in areas where spreading and cutting is required.
- Also, when the trim is removed and out of the way, extra space is gained for cutters to sever pillars and make deeper relief cuts. Reclining the front seat or removing it completely, if possible, makes inserting a backboard more convenient for patient removal.
I have written a few articles on side-impact extrication options in the last few years, as I have found that they have been the most challenging incidents with the highest fatality rates. Knowing a few solutions for these types of crashes will hopefully help you increase the survivability of your patients. Good luck and keep safe!
Randy Schmitz is a Calgary firefighter who has been extensively involved in the extrication field for 19 years. He is an extrication instructor and has competed internationally. He is the education chair for Transport Emergency Rescue Committee (T.E.R.C.) in Canada, a T.E.R.C. International extrication judge and a tester and evaluator for manufactured prototype products for extrication equipment. He can be reached at rwschmitz@shaw.ca
Print this page