Extrication Tips: Exposing the weaknesses, Part 2
Chad Roberts
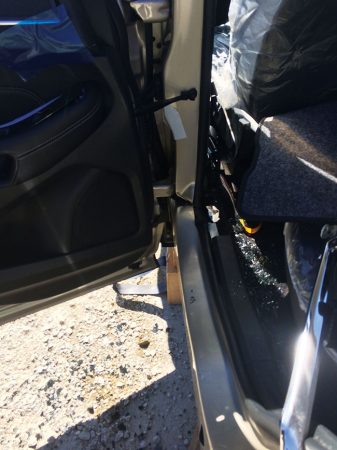
Features Extrication Training Photo 1: Base B post cut is made before the ram is used to push the pillar away from the transmission tunnel.
 In March, my family and I left for our annual spring trip to Florida. With COVID-19 making its way across the Pacific, we knew our travels would likely be a little different: washing hands, keeping distance whenever possible; all the basic stuff we probably should have always been doing in the first place.
But then, about midway through our trip, things started rapidly changing. To our surprise, restrictions on travel, isolation recommendations and return to work issues were swiftly introduced. That being said, we returned safely with no issues but came home to a seemingly different country, community and, overall, a different way of life.
Perhaps the most shocking was, upon my return from vacation, finding out that life in the firehall had radically changed as well. When I left for Florida, I had planned on attending three different extrication competitions and helping a new group of members get ready for their first season on our extrication team, but that all changed. There have been changes to our daily routines and response protocols but, with social distancing in the halls and training programs now on hold, we’ve now entered a bit of a lull period.
Despite all these adjustments, what doesn’t have to change is our level of competency and effort we put towards making ourselves better every day and every shift. Training and researching new topics with our respective crews has become the new norm.
I encourage everyone to take this opportunity to get closer with your respective crews. Learn each other’s strengths and weaknesses and work together to make the group better overall.
Because the pandemic has shut down local training and events, we now have more access than ever to information and expertise from the best and most respected individuals in the fire service through online and social media platforms.
During this time, I’ve dedicated myself to seeking out new information and have accumulated a variety new ideas and tips from industry experts about exposing new car weaknesses.
We left off last article with multiple different options on defeating some of the more difficult scenarios we often face in relation to cutter placement, areas of greater strength and removing doors with handheld tools. This article will focus more specifically on new car technology, their ultra-high strength steels (UHSS) and how we can truly maximize some of our tool potential.
In my previous article, we analyzed some of the diagrams to identify areas and locations of ultra-high strength steel. We logically concluded that no matter what the make or model, these vehicles are continuing to get stronger and add more of this UHSS all over the vehicle, specifically in two locations: B post and the upper rails along the top of the vehicle from A post to C post.
Let’s start with the B post. Not only are varying levels of UHSS being added to this location, these B posts are becoming larger, notably at the base. However, the one thing that generally hasn’t changed much are the posts remaining connected to the vehicle by multiple weld points. Therefore, when trying to perform a “B pillar rip” or “full side removal”, to get the proper tear at our b pillar base after our initial relief cut, there is a more powerful and effective alternative when trying to force UHSS (see photo 1).
Instead of reaching for our spreaders to force this post from its connection point, switch things up a little and try taking a ram and forcing the base of the B post with the opposite ram head pushing of the transmission tunnel (a piece of cribbing may be needed for support). Not only does this create a more central push on the base of our B post, but it also creates a great stress and ultimate failure on the weld points that connect the bottom of the B post.
Next, let’s consider the upper rails. With these areas of the vehicle and posts being strengthened as well as filled with air bag cylinders and seat belt pre-tensioners, a simple option can be avoiding these areas all together.
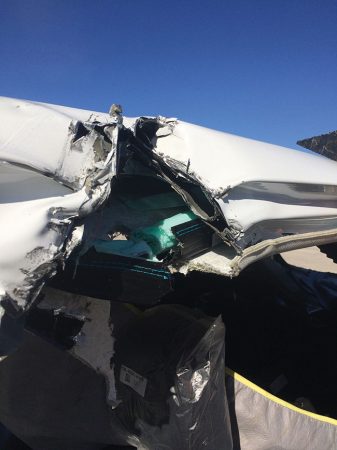
But, how do we avoid these areas when confronted with an incident that most obviously require a roof removal or some type of displacement? Attack inside the roof rails. Create inches and the space you need. Don’t simply remove entire roofs; this will simply waste precious time for your patient. Instead, using your cutter, make dual relief cuts at the rear roof line where it meets the back windshield (see photo 2).
A couple cuts may be required to tunnel deeper into the roof line—this will depend on the amount of roof displacement needed. From here, take your spreader and ram in tandem to push the roof up and forward, creating a can opener effect (see photo 3). This can be a great option for patients in seats that can be lowered and removed out the rear after an opening is created.
By staying to the inside of the roof rails, we avoid these UHSS in the rails and our posts we would be cutting to remove a roof.
If you need a bigger or more precise opening, always remember your hand tools. A sawzall or air chisel can also be used to make a great opening at the rear roof and create a large “U” shaped opening that can be folded forward and tied off.
These areas of UHSS are the norm for us as rescuers, whether we like them or not. We need to take the time educate ourselves and train to defeat these areas. While these two locations are some of the most common for tough steel, we must also get used to seeing them in several different areas as they continue to expand. The pandemic has allowed us time right now to train and better ourselves and our crews. The online world is offering up some of the greatest knowledge base training ever, so take advantage of these great tips and ideas from some of our industry bests.
Chad Roberts is a firefighter in Oakville, Ont. He is a member of the Oakville extrication team and competes and trains across North America. Contact Chad at chadroberts12@gmail.com.
Print this page

