
Extrication Tips: Lifting bags – common practices and principles
Randy Schmitz
Features Extrication TrainingLifting bags: Common practices and principles
 An item on our rescue trucks that doesn’t get a whole lot of use is the lifting bag. Lifting bags are excellent tools in our arsenal that, when used properly, can be a real lifesaver. Unfortunately, like several other tools carried on our apparatus, a lack of regular use of the air bags often weakens the operator’s comfort level and knowledge of the equipment. When deployed by untrained rescuers, this dynamic tool has the potential to inflict unnecessary harm on both the victim and the operator if safety precautions are not strictly followed.
There are two types of lifting bags used in the fire service:
• High-pressure 110-140 psi
• Low pressure 5-15 psi
We will concentrate on the more common high-pressure lift bags that you are most likely to find on a typical fire rescue vehicle.
Advantages:
• Only a thin insertion space is needed;
• Good puncture resistance;
• Quiet operation, completely silent to use;
• Vast range of lifting capacity, one ton to 70-ton bags available;
Disadvantages:
• Limited lifting height;
• Difficult to repair;
• Diminishing power curve;
• Limited life span.
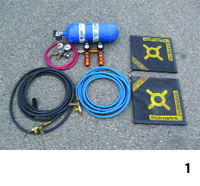 Lift capacities: The lifting capacity is determined by: LxWxInternal Working Pressure (IWP= capacity). Multiply the length and width of the bag (i.e., 20 inches x 20 inches) and multiply that by the operating pressure (118 psi) of the bag. The product is the amount of weight (in pounds) that the bag can effectively lift.
Bag dimensions are 20 inches x 20 inches = 400 square inches.
118 psi x 400 square inches = 47,200 lbs or 22 tons.
The lifting capacity of the air bag decreases as the lifting height increases because there is less functional area in contact with the bag. More contact area increases the lifting capacity.
The power curve: During the lifting process, the air column and lift height are increasing while the contact area between the bag and the object is diminishing, which results in decreasing lift capacity. Therefore the maximum force can only be counted on at the beginning of inflation, which is roughly about the first inch of lift while there is still maximum surface area in contact with the load.
During inflation, the lift bag gradually starts to take on a convex shape similar to a pillow. With the air bag fully inflated, the contact surface and lifting capacity reach their minimum while the lifting height is at its maximum. To correctly operate the lifting bag system, users must be familiar with data about application range, lifting heights and weigh ratios of the lift.
 System components
1. Air supply: May come from SCBA bottles, on-board compressors or reserve air tanks that are built into your rescue vehicle for various purposes (see photo 1).
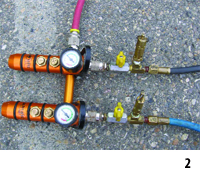
2. Regulator: Generally two gauges regulate the high pressure from the “main” air supply system and then reduce it to low air pressure supplying the lift bag controller.
3. Controller: Controls air entry and release to the lift bags; the dead man style of controller is preferred for safer operation.
4. Hoses: Deliver air supply to the lift bags; various lengths and colours are available and they come with standard quick disconnect couplers. Most systems come with in-line relief and shutoff valves on the controller end of the hose.
5. Lift bags: Made of different types of rubber or neoprene material with steel wire or Kevlar reinforcements.
Assembling the system
(This description is for the Holmatro, Vetter and other similar brands of lift bag systems.) Assembly should start from the high-pressure air supply source. Most often this source will be a 4,500-psi SCBA cylinder. Crack the cylinder wheel for an instant and blow out any debris or foreign matter that could clog or damage the regulator. Connect the two-stage regulator to the threaded intake of the cylinder. The gauge closest to the intake is the high-pressure side; the second gauge indicates the low-pressure operating range of the air being supplied to the lift bag controller.
The next step is to connect the designated “coloured” hose from the regulator to the “inlet” coupler of lift bag controller (usually this hose is shorter than the hoses that connect to the lift bags). These two components connected together by the hose should stay in close proximity so the operator can monitor and have complete control of the system.
 Next, insert the inline relief/shutoff valves (these may be referred to as “pigtails”) to the remaining “outlet” couplers on the controller. The aircock valve on top of the pigtails should be in the closed position, as should all valves during assembly of the system. (See photo 2.) Then, connect designated lift bags to the hose couplers and check all connections so they are in the locked-in position. During assembly you should hear a click when you connect the male and female components to each other. If you did not hear the click sound, disconnect and check for any debris or damage to the couplers then reassemble. Give the two connected components a slight tug – you do not want a hose or connection to become dislodged during a lift as the results could be disastrous.
The system is now ready for air to be released at the main air supply source, which, in this case, is our SCBA cylinder. Ensure your regulator high pressure gauge reading matches that of the pressure on the gauge of the cylinder after you have slowly and fully opened the SCBA cylinder valve. Listen for leaks. If you hear any leaking, tighten the grip wheel on the threaded cylinder intake. There must not be any air escaping from the system.
Next, set the system’s operating pressure to the manufacturer’s recommended psi. All systems have slightly different operating pressures. WARNING!! It is extremely important not to exceed the operating pressure that the manufacturer describes. All lift-bag systems have pre-set pressure relief valves to avoid over inflation of the lift bags. If the pressure is exceeded, air will vent out of the system, wasting valuable air.
 Some responders have marked the operating psi setting on the actual low-pressure gauge lens where the gauge needle should line up; however, this is not recommended because, in most cases, the lens is threaded on to the gauge body and it is possible for the lens to move out of position, thereby giving the operator a false pressure reading.
Next, turn the aircock shutoff valve in line. This will allow air to flow from the controller through the pigtails to the lift bag hoses, then on to the lift bags as soon as the specific inflation push-button valve is pressed. As mentioned, the dead-man style of controller works well. The instant the operator removes his finger from the inflation button airflow to the specific lift bag will stop. Operators must be familiar with the inflation and deflation buttons on the controller before starting any lifting procedure. You can proceed with your lift once you place the system in position.
Placement considerations and stacking heights of the lift-bag system: During your sizeup, you will need to determine the distance between a stable base (usually the ground) and the object to be lifted. The space between the lift bag and the object or load to be lifted should be reduced as much as possible so that no lifting height is lost. You may have to build a stable platform underneath the lift bag with cribbing to fill up this void.
When constructing the box crib or platform’s top layer directly underneath the bags, there must be a solid top layer of cribbing. Any voids in the top layer will cause the bag to push apart and collapse the stacked pieces of cribbing when the bag starts to inflate. This is due to the concave shape that the bag forms once it becomes filled with air. Remember that when the bag nears its full inflation height, the rated capacity declines because surface contact area decreases. To overcome this setback the bag needs to be brought closer to the object being lifted.
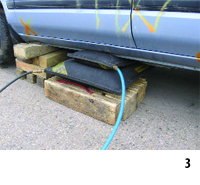
Stacking two high-pressure lift bags on top of one another is another way to overcome the problem of decreased lifting height and surface contact. This should only be done on a stable base with the largest bag on the bottom of the stack. Never stack more than two bags high. Also, ensure the centres of the stacked bags are lined up to one another to assume a straight and even upward lift. Most of the newer style of lift bags have a coloured X or circle in the centre of the bag to assist in identifying the centre and to ensure proper placement.
 When performing a stacking operation, we need to remember the maximum lifting capacity is limited by the smaller bag’s lifting capacity. For example, if you have a 25-ton lift bag on the bottom of a stack and a 10-ton bag on top, you will still only have a maximum lifting capacity of 10 tons. (See photo 3)
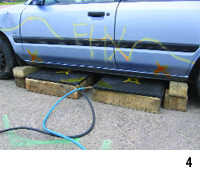
If you need to perform a heavy lift that does not require much height, place two bags, preferably of the same shape, size and lifting capacity, side by side under a load. This will allow you to double your lifting capacity by adding the two bags’ lifting capacities together Essentially you are doubling your lifting surface area to accomplish this. Example: 25-ton x 25-ton = 50 tons of lift. (See photo 4)
Avoid placing lift bags on hot surfaces or sharp objects. If it becomes necessary to do so, use a thick piece of rubber or a floor mat that can mold or take the shape of and protect the top of the lift bag from being punctured. Although some lift-bag reference guides recommend placing plywood between the object being lifted and the top of the bag for protection, recent field tests have shown this can be quite dangerous. When the bags have shifted slightly during the lift, the plywood has slipped out and become a projectile, which can injure anyone nearby. If lift bags will be on the ground, the area must be cleared of debris such as glass, plastic, etc., to ensure the bags won’t slip out under the load.
Lift bags are unstable; therefore, supporting the load as it rises with cribbing is absolutely essential. It is extremely important to follow this simple basic rule: If you lift an inch crib an inch!
Maintain plenty of cribbing pieces of various sizes at hand; build the cribbing support stacks at a safe location and plan so that your stack does not interfere with the egress of a patient.
 Lifting practices
Place lift bags in a prearranged location either on the ground or on a constructed foundation under the load or object to be lifted. Inflation nipples on the bags should face the front side of the lift to have easy access to disconnect the coloured hoses if necessary. Also, if using two lift bags it will help to identify which coloured hose is connected to each bag. Before any lifting procedure is to be initiated, make sure no one is near the bags.
Everyone, except those assisting with the actual lift, should be kept at least 20 feet away.
The officer in charge of the lift should maintain a bird’s eye view of the lift and survey the scene from all angles to monitor and anticipate any unwanted movement or load shift.
When the lift is ready to commence, the officer in charge should call out his commands loudly and clearly. For example, if the initial lift bag that is to be inflated has a blue hose attached to it, the officer can say “Up on blue.” The application of different coloured hoses corresponding to each lift bag removes any confusion about which bag is to be inflated or deflated.
The rescuer operating the controller should try to maintain a good visual of the constructed lift bag system but still remain out of the line of fire in case the bags inadvertently shoot out from under the load or object.
The lift bag controller/operator needs to inflate the bags at slowly and in a controlled manner. Listen carefully to the officer in charge and anticipate a freeze of the operation in order to evaluate the lift procedure for unwanted movement or load shift.
Every inflation and deflation must be directed by the commanding officer and the process strictly adhered to by the lift-bag operator. Any freelancing on the operator’s part could have dire consequences because the operator does not have same perspective on the stability of the load as the officer in charge has from his position.
If you are employing a double-stacked lift-bag method, the best practice is to slightly inflate the upper bag, allowing it to mold to the object or surface, and give good adherence from the bag’s ribbed exterior. To obtain greater lifting height, start to inflate the bottom bag as the foundation. You should inflate the lift bags only as much as required, keeping in mind that the more concave or pillowed the two stacked bags become, the more unstable the lift. Imagine trying to balance two footballs on top of each other. Plan your lift accordingly!
 Once the lift starts, cribbing personnel should establish contact with the ground surface or foundation and the load with their crib support stack immediately. If possible, while cribbing, rescuers should try to work with only one knee on the ground. This puts them in a better position to immediately push out of the collapse zone if an unfortunate situation presents itself. Every split second counts.
Cribbers may have to call out a self-imposed freeze in order to change certain sizes of cribbing blocks to maintain a safe distance between the load and lower crib support stack at all times. Remember, never have more than a one-inch space between the crib support stack and the load. If the load shifts or there is failure within the system, the load will come to rest on the cribbing support stack. Bag failure should never cause a lift failure.
As soon as the lift has met the required height, the load is blocked up solidly. If space allows, slightly lower the load onto the cribbing stack supports to take some of the weight off the load. The patient is ready to be removed.
Do not leave lift bags inflated for any length of time as it is possible for a slight amount of air to enter the system. Even if the air-control valves are turned off on the high-pressure side the bags could slowly continue to inflate, upsetting the load.
You can now reverse the lifting procedure to disassemble the operation. Start by inflating the bottom bag to take the load off the cribbing support stacks.
Cribbers can now start to remove lumber incrementally. A co-ordinated effort by the cribbers to safely and slowly remove cribbing while still maintaining no more naa one-inch space in between the load and foundation as the lift height is diminishing, requires diligence and practice. Take your time. It is critical not to speed up the process just because there is no longer a patient at risk.
There is a high risk of load failure at this point if we do not pay complete attention to what we are doing.
 Lifting round objects
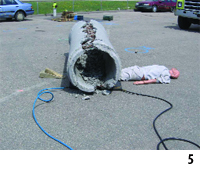
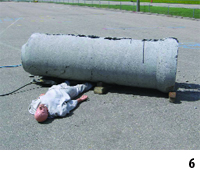
Place the appropriate sized lift bags on both sides of the object. The bags will inflate at a slight angle so double stacking in this application is not advised. Do not use cribbing to fill voids between the bag and the round object. It is imperative to inflate the lift bags simultaneously to create an even lift height. If you inflate one bag more than the other the object will want to roll to one side, putting rescuers or patients at risk.
If more lifting height is required, add additional larger lift bags next to the existing bags and continue the lift. (See photos 5 and 6)
Separating or pushing vehicles apart for trapped patients:
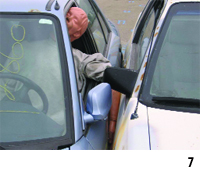
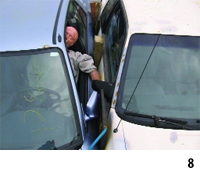
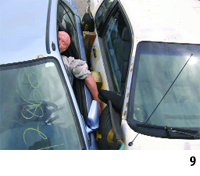
Insert lift bags as far in as possible without causing movement, preferably on structural components of the vehicle such as fire wall area, C-pillars etc. Insert cribbing wedges on hard points and avoid weak areas if possible, such as fenders, plastic etc., as they may buckle under pressure. Inflate lift bags slowly while being sure to continually fill voids that are created with wedges. (See photos 7, 8 and 9)
Other possible uses for lift bags:
• Beam lifts: Spreading security window bars apart;
• Separate machine rollers due to extremity entrapment;
• Opening up large freight doors.
Care and maintenance
Lift bags should be stored for transport on the rescue vehicle with the inflation nipples facing upwards to avoid impact damage. The nipples should be capped at all times, except when in use, to avoid foreign matter entering the bag.
 Clean lift bags after each use. Remove all dirt and debris with a hard-bristle brush and cold water. If there is oil, grease or other petroleum-product spots on the bags, use mild dish detergent to remove then rinse thoroughly and avoid getting any water into the airbag. After cleaning, check for cuts and abrasions and look all along the outside seam for any separation or defects. Check for any wires sticking out of the bag surface. Perform periodic operational checks. Assemble the system, inflate the bags to less than half their capacity then isolate bags from the air supply. Leave inflated for 10 minutes and take note of any leakage. If a leak is suspected, remove the bag from service and notify the manufacturer. All lift bags have a life span, some longer than others, but in general they should be replaced after about 10 years, even if they show no signs of external wear, since the aging process of the rubber takes occurs inside the bag as well as outside. Inspect all hoses for cracks and nicks. Replace scratched lens covers on gauges. Check over all other system components for damage or wear.
List of dos and don’ts
• Never use, interchange or connect other manufacturers’ parts and components to your lift bag system;
• Always wear proper PPE while performing lifting operations;
• Never stack more than two bags high;
• Always crib as you lift;
• Never consider lift bags to be stable;
• Always check condition of lift bags and components before and after use;
• Avoid inserting lift bags at angles of more than 30 degrees as there is a high risk of them slipping out from under a load;
• Never stand directly in front of inflated lift bags as they could slip out and cause injury.
Conclusion
Working with lift bags depends on factors such as anticipating angles, lifting heights, capacities, shapes of objects and common sense. None of it is difficult but all of it is dangerous. Experience and practice is your best tool!
Randy Schmitz is a firefighter and extrication instructor with the Calgary Fire Department and has been involved in the extrication field for 14 years. He can be reached at rwschmitz@shaw.ca .
Print this page