
Extrication Tips: April 2012
Randy Schmitz
Features Extrication TrainingVehicle safety has improved in recent years.
Vehicle safety has improved in recent years. If we look at motor vehicle design today in regards to safety, the passenger compartment is well protected, as crash energy is diverted around, under and over the vehicle. This is accomplished through engineered crumple zones in the front upper rails of the engine compartment, and collapsible engine cradle bars that absorb the impact energy and divert it away from the passengers.
However, the incidence of foot and ankle entrapment has increased. Foot and ankle entrapment are mainly caused by foot-compartment deformation in head-on collisions, more so if the impact is a frontal offset crash and on the driver’s side. Therefore, improvements to foot compartments are essential for entrapment reduction. On a few 2012 models a crushable brake- and accelerator-pedal assembly, and collapsible steering columns, have helped. Also, knee airbags keep the driver in the correct position to receive secondary restraint supplementation, and help to prevent the occupant from submarining underneath the dash.
Conversely, when there is a high-speed collision, the crash force may be beyond the limits of the repelling ability of the vehicle’s design. Each metal fixture in the crash zone needs to absorb as much energy as possible before failing. Once the energy is beyond this safety threshold, intrusion into the passenger compartment areas is likely to cause body-part or lower-extremity entrapment. Often, when drivers anticipate a crash, a natural reaction is to depress the brake hard with the left foot. This leaves the foot close to the floor pan and increases the risk of lower-extremity entrapment.
Foot entrapments
There are many times during severe frontal crashes when the vehicle’s floor or toe pan will wrap itself around the feet of the front-seat occupants. One disentanglement method is the common dash lift or roll, to create space between the dashboard / knee bolster and the floor pan. In most cases, this popular procedure has a very high success rate for gaining sufficient access to the lower-extremity entrapment.
 |
|
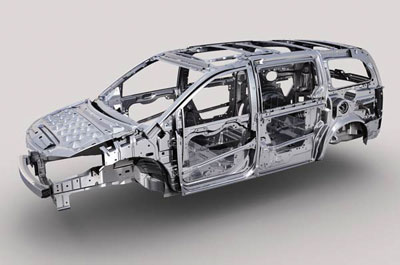
| Photo 1: Design changes have forced rescuers to alter the way we have handle common relief-cutting procedures and locations.existing windows. Photos by Randy Schmitz | |
 |
|
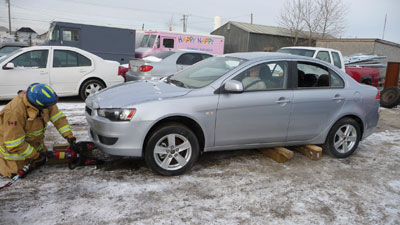
| Photo 2: When sufficient lift height has been gained, crib up the front of the vehicle to keep it suspended and remove the spreader. | |
 |
|
| Photo 3: Make a relief cut through the driver’s side A-pillar above the lower hinge, and an additional relief cut near the base of the B-pillar at the rear of the door opening. |
|
 |
|
| Photo 4: In addition to this cut at the B-pillar an inspection must be done to ensure the seat and floor pan will be able to pass by the remaining B-pillar as the section is pushed down. |
|
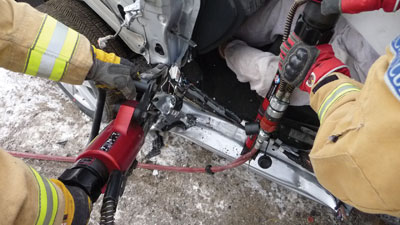 |
|
| Photo 5: The rocker panel will separate from the vehicle at or near where it is spot welded to the vehicle body. | |
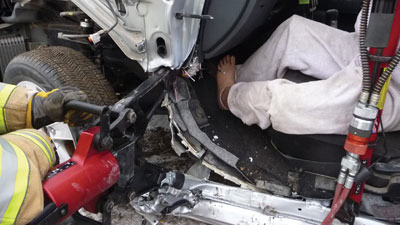 |
|
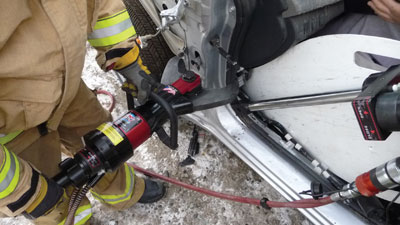
| Photo 6: Insert your spreader in the opening at the A-pillar cut and spread the floor pan down even further until it touches the ground. | |
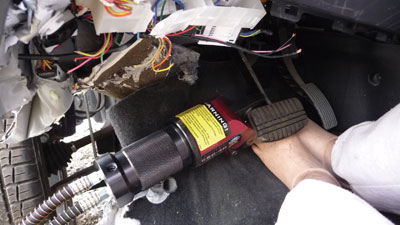 |
|
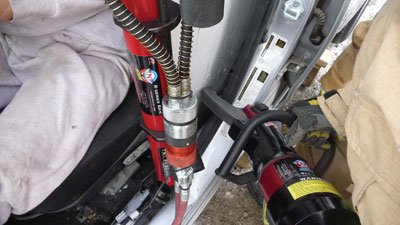
| Photo 7: The brake-pedal cutte is specifically designed to get into those tight spots where space is limited. | |
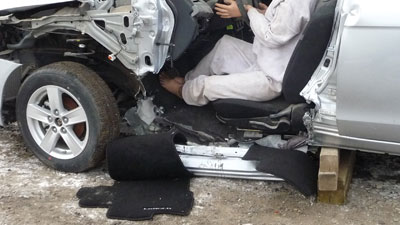 |
|
| Photo 8: If just a small amount of space is required to release the patient, this method may prove to be more efficient than the standard dash lift or roll.
|
The challenge for rescuers is that design changes on some of today’s vehicles have forced us to alter the way we have handle common relief-cutting procedures and locations (see photo 1). Let’s look at dash lifting in rough detail, For example, typically we would expose the upper engine compartment rail, make a relief cut behind the strut tower, make a second relief cut in the lower A-pillar, and then a third relief cut or section out of the upper A-pillar to completely disconnect the dashboard from the rest of the vehicle. At this time, a hydraulic ram or spreader would be used to move the disconnected dash section up and away from the patient. However, some late-model vehicles have incorporated this crash energy dissipation in the engine compartment, which means that the upper rails are made with high-strength steel, which can be so thick you can’t get the cutter blades around it to severe the material for the intended relief cut. Once the fender is exposed and this problem is recognized, an alternate technique is to work around the high-strength steel, if possible. One such option would be to directly attack the area of entrapment, which is the weaker foot-well area that consists more or less of basic sheet metal.
Procedures
If we look at a common frontal collision, be it off-set or head-on, often the driver’s side rocker panel will be very close to the ground as a result of the crumple zones doing what they are designed to do, which is basically to take the engine parts and components and divert them around, away from or under the passenger compartment during the crash. Also, the front tire will be either completely missing, not in the original position, or could lodged into the passenger foot-well area, causing some entrapment. Attempts to remove the tire by unbolting or cutting the steering-control arms or axle may have to be undertaken in order to have sufficient room to work. At this time, it is necessary to create space between the surface and the underside of the rocker panel to perform the floor-pan displacement evolution. Insert a hydraulic spreader underneath, near the front of the vehicle, and locate a strong lift point – usually this will be some piece of the front engine compartment that has remained solid enough so the spreader tips can be inserted into it. Carefully start to lift the front driver’s corner of the vehicle off the lower surface to roughly eight to 10 inches to create space under the rocker area, as this will be needed to push the metal back down. When sufficient lift height has been gained, crib up the front of the vehicle to keep it suspended and remove the spreader (see photo 2 on page 26).
Next, make a box crib under the drivers side B-pillar, leaving the area underneath clear of any obstructions as this space will be used to push the rocker panel and floor pan section down.
The next step is to make a relief cut through the driver’s side A-pillar above the lower hinge, and an additional relief cut near the base of the B-pillar at the rear of the door opening (see photo 3 on page 26).
In addition to this cut at the B-pillar, an inspection must be done to ensure the seat and floor pan will be able to pass by the remaining B-pillar as the section is pushed down (see photo 4 on page 26). Cutting the driver’s side seat track toward the rear of the seat assembly may also be required so the sheet metal floor will tear when pushing it down. At this time, a telescopic ram can be placed in the center of the driver’s side opening with the top ram tip locked on to the roof rail and the ram base placed on the rocker panel. Push down the floor and seat until it touches the ground.
Insert the hydraulic-spreader tips in the relief cut that was made in the lower A-pillar and also push down to the ground, while closely watching the entrapment area closely. If everything goes as planned, the rocker panel will separate from the vehicle at or near where it is spot welded to the vehicle body (see photo 5 on page 29).
Again, insert your spreader in the opening at the A-pillar cut and spread the floor pan down even further until it touches the ground (see photo 6 on page 29). As the floor moves downward, it will unfold the metal floor and lower firewall helping to release the victim’s feet, or, at the very least, open up the area to gain better access to the entrapment.
Hand tools such as an air chisel can also be used to help to gain space, by cutting the wheel-well area from behind. Rubber floor mats, sound-absorbing material and carpet may also have to be cut away when making space; a carpet knife works well for this because of the curved blade, which is fairly safe to use while working close to the patient. Once the space requirements are achieved from the sheet metal removal, the tool of choice to cut the harder steel, such as the brake and accelerator pedals, is a confined-space tool, or so-called brake-pedal cutter. This high-strength cutting tool is specifically designed to get into those tight spots where space is limited (see photo 7).
All mainstream rescue-tool manufactures now offer this tool due to the increase in foot entrapments.
Once the pedals have been severed, it is a good idea to cover up the sharp ends with a tennis ball that has a small incision cut into it. This helps to protect the patient’s appendages when removing him from the vehicle. This evolution should also be taken into consideration when the patient’s knees are trapped by the dashboard (assuming there was no knee-bag supplementation). If just a small amount of space is required to release the patient, this method may prove to be more efficient than the standard dash lift or roll (see photo 8).
Points to consider
Be mindful of wiring harnesses, fuel lines and brake lines running near the outside of the rocker panel underneath the vehicle; you may have to unclip them from the vehicle body and slide them aside somewhat so that they’re out of the way of cutting operations.
Always use hard protection between the patient and a working tool.
Cover all sharps created by either the collision or tools themselves.
This procedure can work on either two-door coupes or four-door sedan type vehicles. Make sure you check to see what kind of vehicle body type you’re dealing with; uni-body type construction is a non-issue, however, a full-frame vehicle will be quite a challenge and other options may have to be considered.
Stay safe!
Thanks go out to Mitsubishi Motors and TnT Rescue tools.
Randy Schmitz is a Calgary firefighter who has been extensively involved in the extrication field for 20 years. He is an extrication instructor and has competed internationally. He is the education chair for Transport Emergency Rescue Committee (T.E.R.C.) in Canada, a T.E.R.C. International extrication judge and a tester and evaluator for manufactured prototype products for extrication equipment. He can be reached at rwschmitz@shaw.ca.
Print this page