
Extrication Tips: October 2012
Randy Schmitz
Features Extrication TrainingEditor’s note: This multi-part series on the evolution of hand tools will detail alternative options to hydraulic tools so you’ll know what to do when the need arises.
Editor’s note: This multi-part series on the evolution of hand tools will detail alternative options to hydraulic tools so you’ll know what to do when the need arises.
 |
|
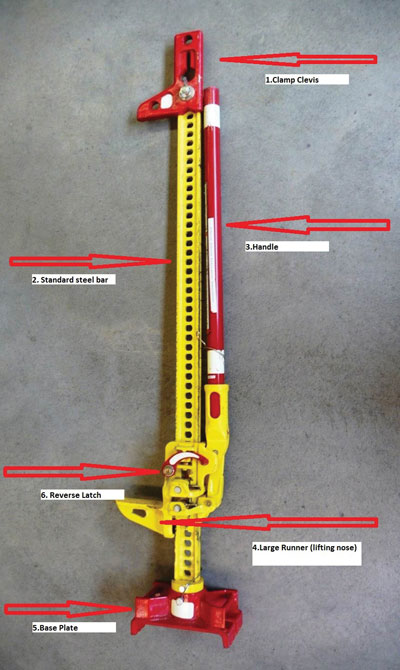
| Photo 1: The components of the First Responder Jack, a derivative of the Jack All, have been modified to pertain directly to vehicle rescue situations. Photos by Randy Schmitz |
|
 |
|
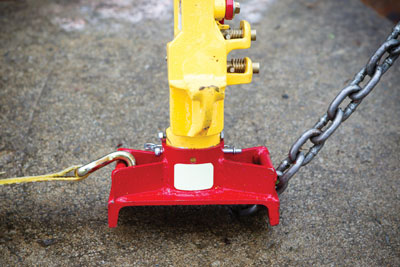
| Photo 2: The base plate of the First Responder Jack can be rotated 360 degrees using a removable pin system.
|
In the August 2011 Fire Fighting in Canada I talked about a new hand tool that had just entered the market called the First Responder Jack (FRJ) by Hi-Lift. This interesting design is a derivative of a common industrial tool known as the Hi-Lift Jack. I’ll give you a bit of history from the company that manufactures the jack, called the Bloomfield Manufacturing Company. Bloomfield started in 1895 in Indiana by Philip John Harrah and is still owned and operated by fourth-generation family members. The device was first called the Handyman’s Jack and a few years later was renamed the Hi-Lift Jack. The Jack’s basic design and function has not changed: it can lift, winch, clamp, pull and push, making it an extremely versatile all-in-one tool and the company’s best-selling product. The FRJ, however, has some modifications that pertain directly to vehicle-rescue situations. Photo 1 shows the tool’s operating parts.
Chris Burdyshaw and Jeff Pugh, firefighters with the Pierce County Fire Department, near Seattle, Wash., and members of the Puyallup Extrication Team (PXT), introduced me to the FRJ. I got to know these two gentlemen while I was judging extrication challenges in the area.
During the events, there was always an area cordoned off for a show-and-tell demonstration where firefighters or tool manufactures could teach different techniques and demonstrate new products. Every year, Chris and Jeff would demonstrate the use of a Hi-Lift Jack with yet another improvement from the year before. They were always making homemade modifications to better use this hand tool for extrication work. When Jeff and Chris approached the Hi-Lift Jack Company to inform them of the alterations they had done to the product to make it more useful for vehicle extrications, Hi-Lift listened and the FRJ was born. The product can now be seen at trade shows, on eBay and in extrication classes, and is started to show up on fire apparatusses as standard equipment. One of the unique features of this jack is the base plate: it has a total surface area of 36 inches (90 centimetres), aggressive teeth to dig into soil, mud and pavement, and a chain slot and ratchet strap hook adapter. The width of the plate is seven inches (20 centimetres), allowing it to accommodate two 4x4s to increase support and surface area. The base plate can also be rotated 360 degrees with a removable pin system (see photo 2). The FRJ features florescent colours so users can easily see moving parts in low light conditions. There are three different Jack sizes: 60 inches (200 centimetres), 48 inches (100 centimetres), or 36 inches (90 centimetres).
Let’s look at the FRJ’s functions that apply to extrication.
Specifications:
- Approximate weight: 27 to 30 pounds (12 to 14 kilograms)
- Rated capacity: 4,660 pounds (2113.74 kilograms)
- Tested capacity: 7,000 pounds (3175 kilograms)
- Climbing pins of specially processed steel with 125,000 PSI tensile strength and 100,000 PSI yield.
- Steel bar is manufactured of specially rolled extra-high carbon steel with minimum tensile strength of 80,000 pounds (36,287 kilograms) and carbon .69 to .82.9
- Steel handle, measuring 1 5/16 inches (33 millimetres) in diameter and 30 inches (80 centimetres) in length, of 14-gauge high-yield structural tubing with a minimum yield of 55,000 PSI.
Features:
- Adjustable top clamp/clevis for use in clamping and winching.
- Safety bolt designed to shear at 7,000 pounds (3,175 kilograms)
- Lifting unit automatically drops away when load is removed for speedy disengaging.
- Lifting nose measures 4.5 inches in length for positive contact with load.
- Steel bar can be reversed for extra-long life.
- Low pickup of 4.5 inches (11 centimetres).
- Mechanical advantage of 40 to one.
- Base plate measures 36 square inches (90 centimetres)
- Handle force required to raise 4,660 pounds (2,273 kilograms) is 177 pounds (80 kilograms) at 34 inches (90 centimetres) on the handle.
- Maximum rated load is 4,660 pounds (2,273 kilograms), up to 48 inches (100 centimetres), and has been tested to 7,000 pounds (3,175 kilograms).
- Upper 12 inches (30 centimetres) of the 60-inch (200-centimetre) jack is rated to 2,660 pounds (1,209 kilograms) and was tested to 4,000 pounds (1,818 kilograms).
For raising a stationary load:
- Securely stabilize the load to prevent it from rolling or shifting as you lift.
- Place the jack’s base plate securely on a firm, level and dry surface with the steel standard bar pointing straight up.
- Lift the reversing latch until it locks in the up position.
- Pull the handle away from the steel standard bar, releasing the handle clip spring.
- Grasp the handle or the handle socket and raise the lifting mechanism until the large runner is completely and securely under the load.
- Grasp the handle firmly with both hands. Carefully pump the handle up and down to raise the load. Do not use an extension on the handle.
- The load will be raised on each down stroke of the handle. Watch the load and the jack carefully. Stop lifting if either one starts to move. Do not continue until it is safe to do so. When safe, stabilize and block the load.
- When the load is raised to the desired height, place the handle in the upright position, clipped to the steel standard bar.
- Block the load securely.
- Lower the load onto the blocks.
- Remove the jack from the stabilized load.
Unexpected movement of the jack handle may result in the user being struck, causing serious injury. Always keep your head away from and out of the path of movement of the jack handle.
If you overload the jack during operation, the shear bolt will break. If the shear bolt breaks, as it will at 7,000 pounds (3,175 kilograms), the jack’s handle will drop freely, though the load should still be supported. Use a jack with a larger load capacity to lower the load safely to the ground. Do not replace the shear bolt with a bolt of greater strength as this could cause the jack to fail and drop the load. Always use a shear bolt supplied by Hi-Lift Jack Company. Do not replace the shear bolt while the jack is under load and never use an extension or cheater bar on the handle.
The jack handle may move rapidly when moving the reversing latch and cause serious injury. Always place the handle against the steel standard bar with the handle clip spring holding it up before moving the reversing latch. This will prevent the handle from moving up and down rapidly. Ensure the handle is not in the horizontal position when moving the reversing latch.
It is important to remember that, during lifting and lowering, the weight of the load pushes up against the jack’s handle. If your hands slip off the handle, or if the handle is horizontal when you move the reversing latch, it may move up very quickly.
The jack must have a load of 150 pounds (68 kilograms) or more to lower step-by-step. Otherwise, the lifting mechanism will slide down to the base plate, dropping your load.
For lowering a stationary load:
- Position the jack under the raised load and raise the stationary.
- Remove the blocks from under the load.
- Be sure the handle is in the upright position, clipped to the steel standard bar before lowering the load.
- Move the reversing latch to the down position.
- Grasp the handle firmly with both hands. Carefully pump the handle up and down to lower the load. The load will be lowered on each up stroke of the handle.
Task: Patient entrapment by the steering wheel
Equipment required: First Responder Jack; 5/8 of an inch (15 millimetre)-rated chain; two 18 to 24-inch (45- to 60-centimetre) 4×4 blocks of standard cribbing; a glass removal tool.
|
|
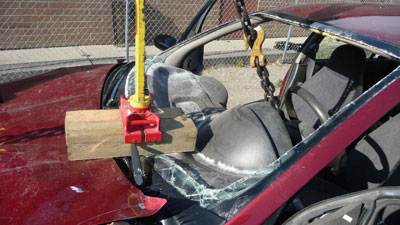
| Photo 3: Place the jack base plate on the blocks, slide the slacked chain over the large runner (the lifting nose) and take up any slack in the chain prior to the lift.
|
|
 |
|
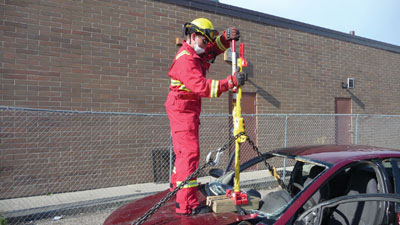
| Photo 4: Under the direction of the extrication officer, operate the jack handle and carefully start to lift the chain. | |
 |
|
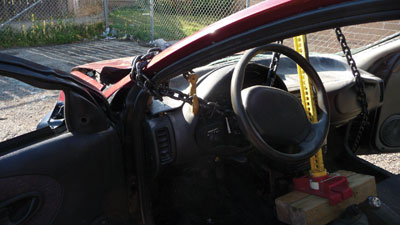
| Photo 5: Completely wrap and secure a rescue chain low on the A-pillar near the corner of the dash area. | |
 |
|
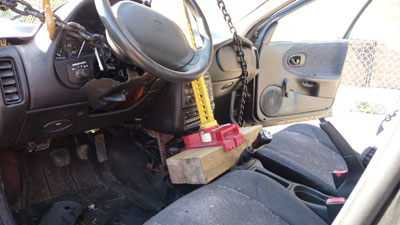
| Photo 6: A good position for the FRJ is on top of the transmission hump or shift console. | |
 |
|
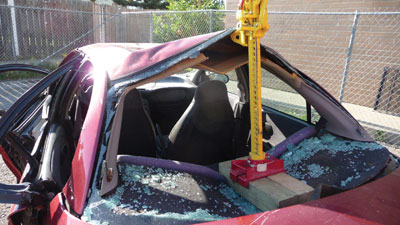
| Photo 7: Place the FRJ on the blocks on the trunk deck, and place the lifting nose just under the middle of the roof section at the outside edge. | |
 |
|
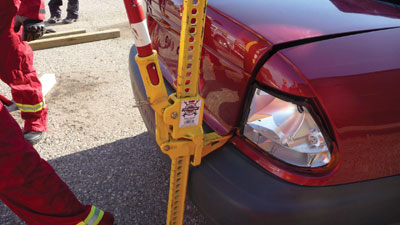
| Photo 8: Place the FRJ lifting nose under a corner of the trunk lid lip. Apply force and slightly twist the trunk lid locking mechanism, which should then spring open. Photos by Randy Schmitz |
Option 1: Carefully remove windshield glass. Place two 18-to-24-inch (45- to 60-centimetre) 4×4 blocks side by side, directly on top of the firewall and in line with the steering column. Wrap the rescue chain low around the steering column. Next, attach the opposite end of the chain to a secure stable component located underneath the front of the vehicle, such as a stabilizer bar or frame component that is in line with the steering column. Make sure to allow a sufficient amount of slack in the chain to accommodate the runner or lifting nose of the jack to slide underneath the chain. Place the jack base plate on the blocks, slide the slacked chain over the large runner (the lifting nose) and take up any slack in the chain prior to the lift (see photo 3). The jack is now in position to lift the column. Ensure the reversing latch is locked in the up position and rotate the handle to engage the lifting nose until the chain is tight. Now, under direction of the extrication officer, operate the jack handle and carefully start to lift the chain (see photo 4). A rescuer is required to be in position near the patient to monitor movement as the steering wheel and column assembly begin to move upward and off the patient’s entrapped area. Create enough clearance between the patient and the steering wheel for easy removal; roughly four or five inches (10 to 12 centimetres).
Option 2: Remove the windshield and completely wrap and secure a rescue chain low on the A-pillar near the corner of the dash area (see photo 5). Carefully feed the chain under the steering column and across to the other side of the passenger compartment, through the open passenger door and locate a suitable and secure place to wrap the chain end around, such as the control arm or the vehicle’s frame. Place the FRJ as close to the steering column and the patient as is safely possible. Two 4×4 blocks may have to be used under the base plate for more surface area and stability. A good position is on top of the transmission hump or shift console, as in photo 6. Place the lifting nose under the chain and take up any slack. The lifting handle should be through the windshield space to allow for a full range of operation. Operate the handle; lift until sufficient space is created.
Rear window tent:
This procedure is used to create space for a rescuer to access the interior and remove the patient rearward out of the vehicle. Remove the rear glass if it is still intact and place two 18- or 24-inch (45- to 60-centimetre) 4×4 blocks lengthwise on the trunk deck (the bulk head) so one end of the blocks are just past the edge of the rear seatback cushion. Place the FRJ on the blocks, and place the lifting nose just under the middle of the roof section at the outside edge (see photo 7). Operate the jack handle; continue to lift the roof section up in the middle so that the lower trunk deck and rear back seat cushion start to move downward creating space. Continue until a large egress hole or tent is created for patient removal.
Trunk lid access:
Place the FRJ lifting nose under a corner of the trunk lid lip. Due to the width of the lifting nose, a purchase point may have to be made for a secure point to lock onto. Ensure a solid base is available or use 4×4 blocks under the base plate. Operate the jack handle; the corner of the trunk lid will start to lift up. Apply a force and slightly twist the trunk lid locking mechanism, which should then spring open, as in photo 8. To have better control, a semi-loose ratchet strap hooked from either rear tire should capture the lid and prevent it from springing open uncontrollably when the lock gives way. This will also minimize the rear suspension from lifting up when the jack is operated.
These are a few of the techniques that can be used with the First Responder Jack.
Keep safe!
Randy Schmitz is a Calgary firefighter who has been extensively involved in the extrication field for 19 years. He is an extrication instructor and has competed internationally. He is the education chair for Transport Emergency Rescue Committee (T.E.R.C.) in Canada, a T.E.R.C. International extrication judge and a tester and evaluator for manufactured prototype products for extrication equipment. He can be reached at rwschmitz@shaw.ca.
Print this page