
Extrication Tips: October 2013
Randy Schmitz
Features Extrication TrainingIn the July issue of Canadian Firefighter and EMS Quarterly, I outlined the design and functionality of the high-tension cable barrier (HTCB) system.
In the July issue of Canadian Firefighter and EMS Quarterly, I outlined the design and functionality of the high-tension cable barrier (HTCB) system.
In this edition, we will discuss a first-responder’s approach to dealing with a vehicle that has been involved in a collision with the HTCB system and the options available to release the vehicle from the cables.
When a vehicle hits a HTCB system, more often than not, it glances off the system and is safely redirected due to the design characteristics of the barrier. However, there are situations in which the vehicle becomes entangled within the system and a means of releasing it is required.
The level of urgency should indicate which method of disentanglement is the best practice in each situation. Another important factor is proficiency; the time required to deal with the cables is very important because working close to the road presents a safety issue for rescue personnel. As rescue personnel become more familiar with disassembly methods, however, the amount of time required on scene decreases.
As rescuer, I make it a habit to never feel comfortable while working at an accident on a highway, even with all the safety protocols in place.
Use caution and best judgment when approaching a situation in which the vehicle is still tangled in the cables as there could be instability. Always keep non-emergency personnel away from the cable system.
Option 1: Release or reduce tension in the HTCB system
 |
|
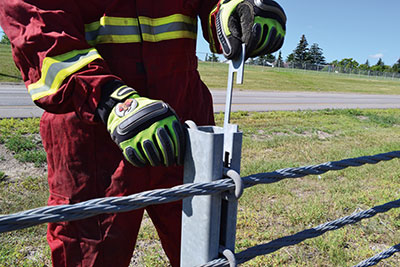
| Photo 1: Pull the top portion of the galvanized metal lock plate slightly upwards while turning the notched metal piece counter-clockwise to release it from the hairpin. Remove it completely from inside the post. Photos By Randy Schmitz |
|
 |
|
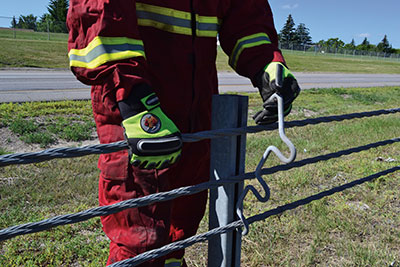
| Photo 2: Grasp the top cable with another rescuer and pull straight up until the hooked end of the hairpin dislodges from the galvanized post’s back side. Then pull the hairpin itself away from the post.
|
There may be enough slack in the cables to move them out of the way of obstruction. Try to manipulate the cables first to see if they will move out of the way enough for you to gain access to either a door or the roof of the vehicle. If the vehicle is not too deeply entangled, move 20 to 30 metres (70 to 100 feet), or six or seven posts, depending on their spacing, away from the incident.
Remove the lock plate that is holding the hairpin in place and grasp the top portion of the galvanized metal lock plate with your fingertips. Pull upwards slightly while turning the notched metal piece counter-clockwise to release it from the hairpin. Remove it completely from inside the post (see photo 1). Next, grasp the top cable with another rescuer and pull straight up about 7.5 centimetres (three inches) until the hooked end of the hairpin becomes dislodged from the galvanized post’s back side. Then pull the hairpin away from the post (see photo 2). The cables, which are nested into the grooved slots of the hairpin, will fall out as the weight of the cable overcomes the static tension; the additional slack eventually allows the cables to drop to the ground. Note that the cables are not attached to the posts or the hairpin. The remaining hairpin slides down the centre slot in the post and also comes to rest on the ground. If the line post starts to move out of the socket before the cables move, stop and drive a wooden wedge into the side of the post and the socket to ensure it will not move upward. A line post that is under tension and is removed from the socket may kick out and strike the rescuer in the legs or feet. (For a video demonstration, click here.)
Option 2: Release the vehicle
To avoid the need to cut the cable, a tow truck needs to be on the same side of the barrier as the vehicle.
If a vehicle is tangled in the cables, first pull the vehicle back toward the centreline of the cable barrier to take the lateral force out of the cable, and then pull the vehicle out the same way it entered.
A tow truck should be able to lift most vehicles off the cables, if the vehicles happen to be straddling a cable.
It may also be feasible to cut off part of the vehicle that is tangled on the cable, such as the corner of the bumper or the fender, to release it.
Option 3: Release the turnbuckle
 |
|
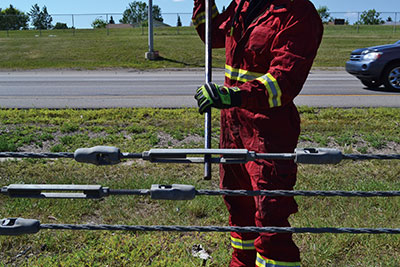
| Photo 3: Insert a crescent or pipe wrench into the centre of the turnbuckle and twist it until the cable becomes slack or the turnbuckle unscrews itself from the thread rods and releases the cable acorn ends.
|
Move away from the scene to the nearest cable splice turnbuckle, and loosen the turnbuckle by a few turns. To loosen the turnbuckle, you need two crescent or pipe wrenches and a long screwdriver or long bar – a pinch point pry bar works pretty well. The longer the wrench is, the better the leverage you will have. The crescent or pipe wrenches hold the acorn cable ends from moving as the turnbuckle body turns. Insert the bar into the centre of the turnbuckle and twist it until the cable becomes slack or the turnbuckle unscrews itself from the thread rods and releases the cable acorn ends (see photo 3). The cable unattaches and moves quickly until it contacts each line post on either side of the turnbuckle. This gives responders more than enough tension release to drop the cables to the ground.
Option 4: Knock over the cable-release post
 |
|
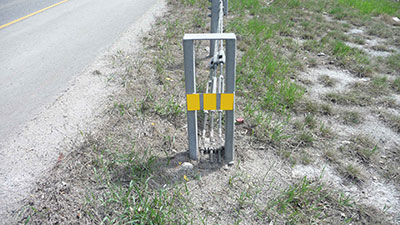
| Photo 4: Locate a police cruiser or a vehicle with a front or rear bumper height that meets the reflective plate on the cable-release end post to push the post over enough that the cables are dislodged. |
This method is extremely effective and immediate; however, the complete system, from anchor to anchor, is rendered ineffective until it is re-installed by maintenance crews. Locate a police cruiser or a vehicle with a front or rear bumper height that meets the reflective plate on the cable-release end post (see photo 4). Slowly push the post over. This breaks the metal wires that hold the anchor nuts onto a three-threaded rod system. The rods become dislodged from the bottom anchor plate, releasing the whole system in one motion. (For a video demonstration, click here.)
It is important to note that the system loses all its effectiveness until it is completely reassembled.
Option 5: Cut the turnbuckle
|
|
| Photo 5: In the same manner as releasing the turnbuckle by unscrewing it, you can cut the turnbuckle in the middle to sever it.
|
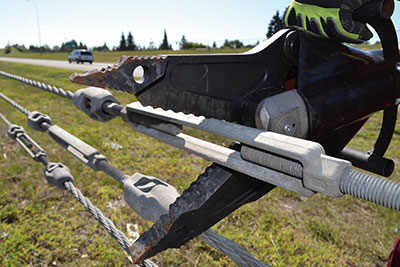
You can cut the turnbuckle in the middle to sever it, the same way you release turnbuckle by unscrewing it (see photo 5). The same precautions should be taken. Maintenance crews normally have quick access to replacement turnbuckles, posts, hairpins and lock plates, which are often stockpiled in a centralized area in their jurisdiction.
Option 6: Cut the cable – the last resort!
Cut the cable only in a life-or-death situation that requires the vehicle or the patient(s) to be removed immediately.
Because of the cable’s weight (475 grams per 30 centimetres, or 1.04 pounds per foot), it should simply fall to the ground rather than rebound as an elastic band would when severed. Still, all personnel – except the rescuer performing the cut – need to stand clear of the system to prevent reaction injuries when cutting.
Ensure that no rescuers are holding the cables near a post as their hand could be pinched when the cable is cut.
Cut the cables in the centre between line posts, 75 to 90 metres (250 to 300 feet) away from the vehicle, and perpendicular to the cable system. If time and manpower permits, remove as many hairpins and lock plates as possible on either side of the cut.
 |
|
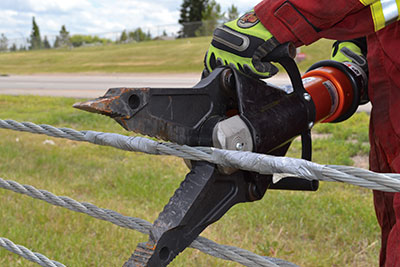
| Photo 6: Wrap the cable several times with duct tape where you are going to make the cut. This will ensure that, when the cable is severed, the individual cable strands will not unravel and strike the rescuer performing the cut.
|
In order to safely cut the cable, find the centre between two undamaged line posts away from the incident. Wrap the cable with duct tape at the spot where you are going to make the cut (see photo 6); this ensures that, when the cable is severed, the individual cable strands will not unravel and strike the rescuer.
If duct tape does not stick due to wet or frosted cables, then heavy plastic zip ties work just as well. (For a video demonstration, click here.)
Remember: Cutting the cable disables the entire system, from anchor to anchor. Until the cut cable strands are repaired, the system loses all of its effectiveness in preventing future accidents; a damaged cable system may allow the next vehicle to pass through and into oncoming traffic.
Training and due diligence
If your department has jurisdiction of a highway with high-tension cable barriers, arrange for training sessions, with course content and reference materials that are appropriate for the particular HTCB system in question. For additional photos and a how-to summary, visit www.firefightingincanada.com and click on current issues.
We hear every day of emergency responders getting hit by
distracted motorists. A defensive frame of mind is essential to your survival on today’s roadways.
Randy Schmitz is a Calgary firefighter who has been extensively involved in the extrication field for 19 years. He is the education chair for Transport Emergency Rescue Committee (T.E.R.C.) in Canada, a T.E.R.C. International extrication judge and a tester and evaluator for manufactured prototype products for extrication equipment. He can be reached at rwschmitz@shaw.ca. Follow him on Twitter at @firedog7
Print this page