Recipe Rescue July 2017: Hot grilling tips for summer
By Patrick Mathieu
Features Health and Wellness Nutrition annex Canada firefighterFinally friends, summer is upon us. As Canadians, we patiently wait for these few cherished months to get outside, reacquaint ourselves with our neighbours and enjoy our beautiful surroundings. In the cooking world, summer means it’s time to roll out the grill. It is hard to beat the satisfaction of standing over your grill on a beautiful summer day. Needless to say, everyone loves a good barbecue.
That fact is evident in the types of grills and tools available to the home cook. Take a stroll through any home improvement or appliance store and you will surely be overwhelmed with the options of grills and tools.
What type of fuel do you want to use – gas, charcoal or wood? How are you going to grill your food – direct/ indirect heat, infrared or smoke? Do you use briquettes, wood pellets or planks? I believe the key is to customize your grill by finding the best grill for your lifestyle. Different grills do different things, so find what works best to ensure you have the most enjoyable cooking experience.
Grilling can be simplified into three main factors: food type, heat source and desired result. The only necessary ingredients are food, fire and creativity; the rest is up to you. Factor in personal preference and beautiful weather and we have a recipe for grilling success.
Here are a few tips to help you master your fire:
Have everything ready before you fire up. You can’t just turn your grill on and off at a moment’s notice. Mise en place is essential for grilling, so have your meat, vegetables, brushes, cutting boards, sauces and condiments ready before you get to the grill.
Choose the right fire for the job. The techniques of direct and indirect grilling, high heat or slow and low might be one of the most important things you can learn. There is so much more to grilling than building a giant inferno and throwing some meat on it. Doing so often produces food with a charcoal exterior and a raw interior. You need to know what type of flame to use for the job. If are cooking food that requires high heat and a sear method, then direct grilling is necessary. This method works best with thin burgers, steaks, chops, seafood or vegetables; the interior will cook through and the exterior will have some nice browning on it.
For a gas barbecue, searing means having all burners set to an equal, relatively high heat. If you are using charcoal, it’s best to lay the hot coals out in a single layer across the entire grate. For thicker cuts of meat, you might want to try using a two-zone direct fire. On a gas grill this means turning half of the burners on high and the other half on low.
For charcoal, have two-thirds of the hot coals on one side of the coal grate and one-third of the hot coals on the other half. This process is perfect for searing over the very hot side and then moving the food to the cooler side to finishing cooking at a gentler pace. This method provides greater control over your grilling. If food is getting a little too charred, then simply move it to the cooler side. This technique also allows you to simultaneously cook items with different cooking times.
Indirect cooking is the method of having all of the coals on one half of the coal grate and the other half completely empty. For gas barbecues, half of the burners need to be set on medium to high while the other burners are turned off. This method is perfect for slow and low cooking, which is used for large cuts of meat such as whole chickens, prime rib, ribs or pork shoulder. This technique offers smoky, succulent meat that you can get only by grilling at a very gentle pace.
Clean your grill every time you use it. At the beginning of each grilling session, start by preheating the grill. Always preheat the grill at a high temperature, then reduce the heat or move the coals around. After pre-heating, give the grill grates a good scrub with a brush then lightly oil the grates with a paper towel dipped in vegetable oil and held with tongs. This is all the maintenance the grill will need for the season if done before each cooking session. After a winter in hibernation, give the grill a little extra love by taking a tip from your self-cleaning oven: heat the grill over super high heat for about 10 minutes, allowing any rust and other debris to turn to embers, that can be easily brushed off.
Although all-in-one barbecue tool packs are enticing, they are really unnecessary. To be a backyard grill master, all you really need are long-handled tongs, a couple of sturdy spatulas (using two spatulas is great to flip delicate foods such as fish) and a grill brush. If using charcoal, I recommend a chimney starter so you can ditch the lighter fluid. I would invest in a meat thermometer. It is essential tool if you are serious about perfectly cooked meat. Without it, cooking is a guessing game.
Finally, let the meat rest. Step back; just step back. As tempting as it is to tear right into your barbecue creations, you have to let the temperature normalize and allow all the juices to redistribute throughout the cut, instead of juice ending up all over your plate.
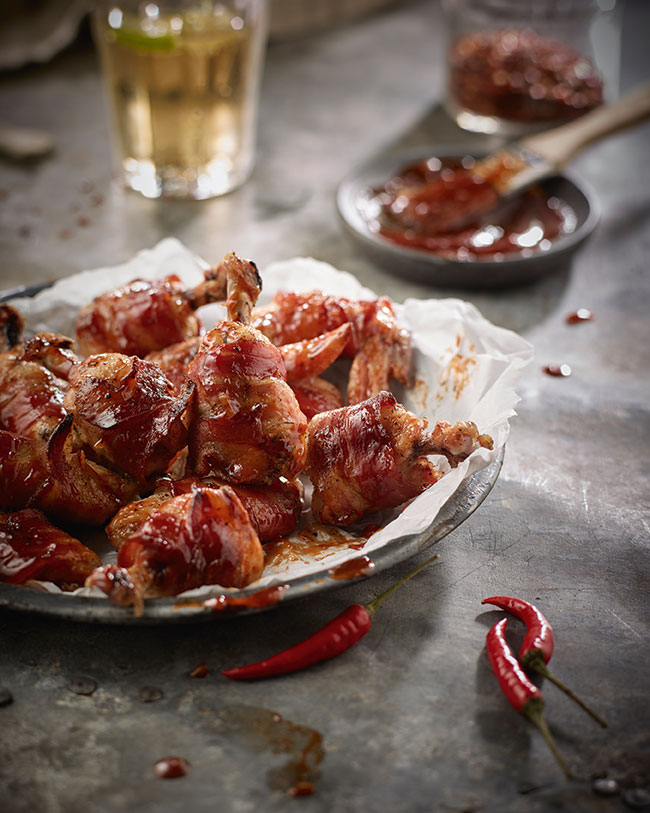
Bacon wrapped chicken wings with bourbon glaze
Ingredients
- 30 fresh whole chicken wings
- 30 slices thinly sliced bacon
- Freshly ground black pepper
- 30 toothpicks soaked in water for one hour
BOURBON GLAZE
- 3 tablespoons butter
- ¼ cup brown sugar
- 4 cloves of garlic (finely chopped)
- ½ teaspoon prepared horseradish
- ¼ teaspoon ground ginger
- ¼ cup soy sauce
- ½ – ¾ cup bourbon
- ¾ cup ketchup
- A few dashes of hot sauce
Directions
- Working with 1 wing at a time, wrap tightly with a slice of bacon, starting at the top and spiralling to the bottom. Secure with toothpicks if necessary. Season the bacon-wrapped wings liberally with the pepper.
- Prepare the grill for cooking over indirect heat. Grill the wings on the side of the grill with no heat for 30 minutes. Flip and cook for another 30 minutes, until the bacon is crisp and the wings are fully cooked. Just before transferring the wings to a platter, brush liberally with the bourbon glaze. Let wings rest for 5 minutes before serving.
- For the bourbon glaze, combine all ingredients in a small saucepan and simmer for 10 minutes over low-medium heat.
- Drizzle wings with more bourbon glaze or serve on the side for dipping.
- Remove the toothpicks and serve. Enjoy!
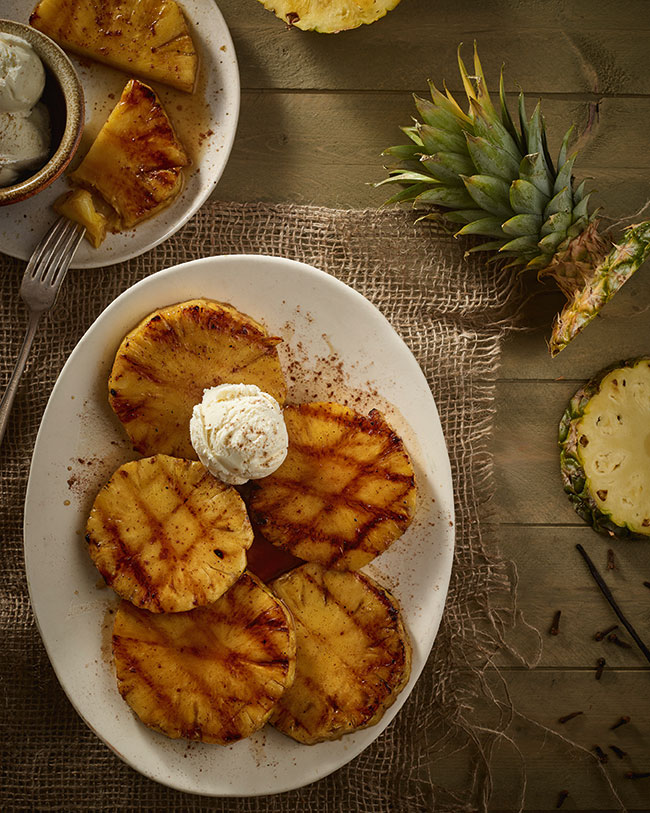
Grilled pineapple with bourbon glaze
Ingredients
- 1 pineapple, top and bottom removed
- ½ cup bourbon
- ½ cup brown sugar
- ¼ cup olive oil
- 2 tablespoons butter
- 1 ½ tablespoon ground cinnamon
- ½ teaspoon salt
- ¼ teaspoon ground cloves
- ¼ teaspoon ground cayenne pepper
- Vanilla ice cream, for serving
Directions
- Cut body of pineapple into 6 slices of even width. Halve each slice. Set slices in a baking pan or deep platter.
- Mix remaining ingredients together in a saucepan and bring to a boil over medium-high heat. Stir until well combined. Continue to boil until sauce thickens into a glaze, about 5 minutes.
- Pour glaze over the pineapple slices as a marinade.
- Preheat your grill until it is very hot and set up for direct grilling. Grill the pineapple slices, basting periodically with the glaze, until charred. Grill marks should be visible on the pineapple, grilling about 5 minutes per side. Remove pineapple from the grill and drizzle with any remaining glaze. Serve warm with vanilla ice cream! Enjoy!
Patrick Mathieu is an acting captain at Waterloo Fire Rescue in Ontario. stationhousecateringco@yahoo.ca @StationHouseCCo
Print this page
Advertisement
- Fit for duty July 2017: Simple ways to eliminate health hazards
- Blaze destroys Saint John, N.B. home